Credit Claims, available from the Stock menu, allows you to create a Credit Claim Request for Norco. You can enter the products and quantities being claimed, add photos where required, and send the request to your Norco Dispatch Site.
Before creating a Credit Claim Request, make sure the correct Norco Dispatch Site has been selected in General Settings.
Setting the Norco Dispatch Site
The selected Norco Dispatch Site determines where the Credit Claim Request will be sent.
- Select General Settings from the Settings menu
- Select the General Settings tab on the left
- In the Norco Dispatch Site field, select Labrador or Raleigh, depending on your Dispatch Site
- Click Save Changes
Creating and Sending a Credit Claim Request
The Credit Claims List
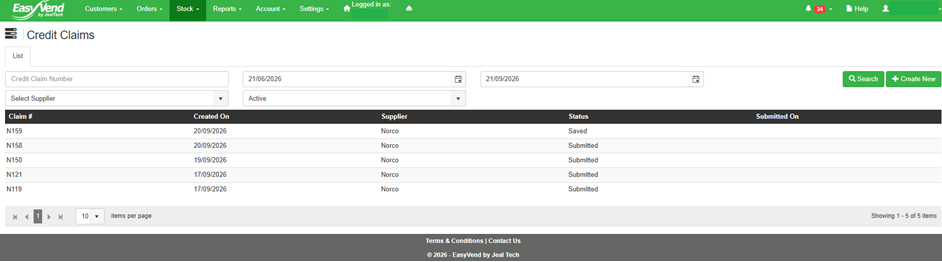
When you select Credit Claim from the Stock menu, a list of previously created Credit Claim Requests is displayed. In this list, you can:
- Enter a Credit Claim Number to find a specific claim
- Enter a date range to search for claims created within that period
- Select a Supplier or Status to narrow the list
- Click Search to display the matching claims
- Click a claim in the list to view its details
- Click Create New to begin a new Credit Claim Request
Claim statuses:
o Saved: The claim has been saved but has not yet been sent. You can open it to add photos, review the details and send it.
o Submitted: The claim has been sent to the selected Norco Dispatch Site.
Creating a Credit Claim
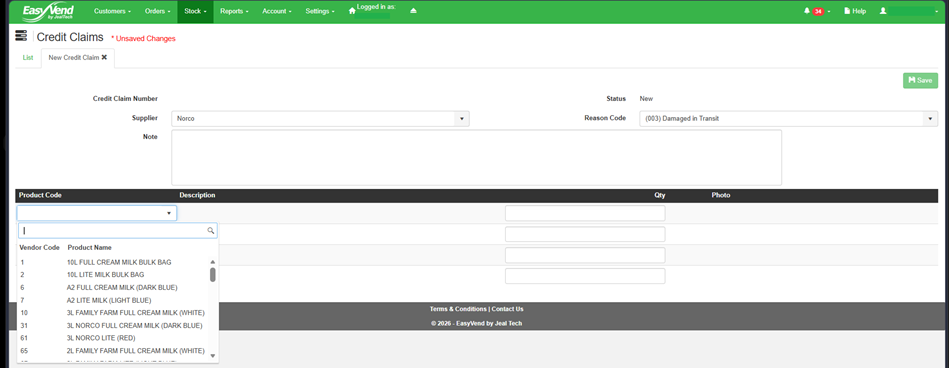
To create a new Credit Claim Request:
-
Select Credit Claim from the Stock menu
-
Click Create New
-
Select Norco from the Supplier list
-
Select the applicable Reason Code
Note: A Credit Claim can only have one Reason Code. If different products require different Reason Codes, create a separate Credit Claim Request for each Reason Code.
- Enter any relevant information in the Note field
- Select the first product from the Product Code list
- Enter the quantity being claimed in the Qty field
- Repeat these steps for all products covered by the selected Reason Code
- Click Save
Adding Photos
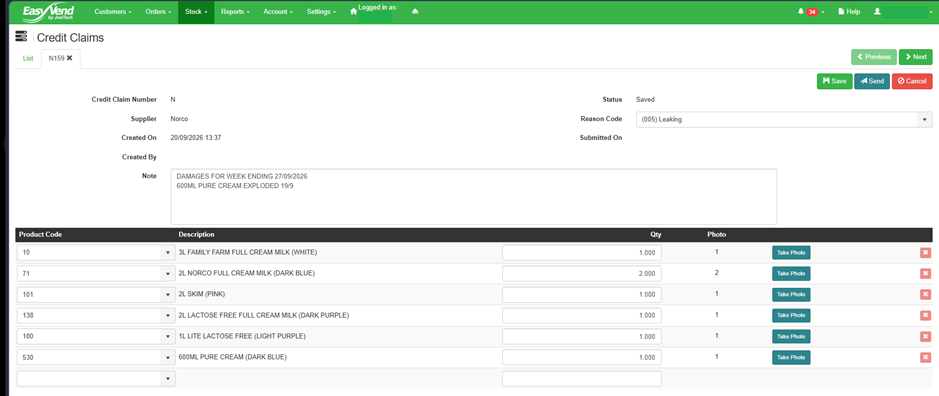
Once the Credit Claim Request has been saved, the Take Photo option is displayed for each product line.
- Click Take Photo beside the applicable product
- Follow the on-screen prompts to take or attach the photo
- Repeat this process if more than one photo is required
- Click Delete below a photo if it needs to be removed
Sending the Credit Claim Request
Before sending the request, check that the Supplier, Reason Code, products, quantities and required photos are correct.
- Click Send
- The Credit Claim Request will be sent to the email address for the Norco Dispatch Site selected in General Settings
- The claim status will change to Submitted