In the Settings menu, General Settings enables you to create look-up lists, configure settings, and update options. Click an option in the menu on the left side of the screen to view the settings screen for that option.
Many of the options in General Settings are lists of items that you will be able to select from when entering data. You can add or edit items to suit your needs. Many of these lists have a common set of editing tools:
- Click Create New to add a new item to the list
- Click
 to make changes to an item
 - Click
 to delete an item that is not in use
- Generally, if the item is already in use in EasyVend, the icon is disabled and the item cannot be deleted
- Often, if you cannot delete an item, you can mark it as 'Inactive' so that it can no longer be selected when its drop-down list is displayed
- Generally, if the item is already in use in EasyVend, the
- After adding or editing an item, click
 to save your changes, or
  to cancel them
 - Notes:
- Tick Show Inactive at the top of the list to include items that have been marked as Inactive
- If you have a long list of items, the navigation controls at the bottom of the list can be used to set the number of items displayed per page, and to move between pages
- Most numeric fields in EasyVend have a general maximum length of 8 characters and a range of -99,999,999 to 99,999,999
More complex lists, such as central billing and depot order configurations, will not have the edit icons on the right. Instead, click on an item in the list to edit it. A new tab will open, enabling you to make changes and then click Save Changes.
Customer Groups
Customer Groups are used in the customer screen to group your customers into different categories, such as Schools, Hospitals, Bakeries etc. You can run reports for different groups for data analysis.
- Code: a unique alphanumeric code of up to 5 characters
- Description: a description for the group of up to 20 characters
- Inactive: tick this checkbox to make a group inactive
- Inactive groups will no longer appear in drop-down lists when selecting groups
- Customers: shows how many customers are allocated to the group
- A group can only be deleted when the number of customers is 0
Bank Account Settings
You can have multiple bank accounts setup in EasyVend. In many cases monies received from your customers will go into one bank account which will be your default account. However, if you require some transactions to move into an alternative account you will be able to select that at the time of entering a receipt.
- Account Name and Account Number are mandatory
- If you have more than one bank account, click Make Default to change the default account
Central Billing Configuration
This is used within the Central Billing screen for distributors who send central billing to their supplier. You can have multiple configurations, but each configuration applies to a single supplier.
- Config Name: up to 20 characters; must be unique
- Supplier Account Number: this is your account number with your supplier so they can identify you
- Vendor Pin: this is provided by your supplier. Only applicable to some suppliers and can remain blank if not used by your supplier.
- Supplier: Each Central Billing file generated using this configuration will be limited to this supplier's customers only; must be selected from the list
- Round: If you want to send only some rounds, you can select one or more rounds and only customers within the selected round(s) will be included in transmission of your Central Billing
- Customer Group: Select a customer group if you wish to include only customers in that group when transmitting Central Billing for this configuration
- Customer From and Customer To: Select a range of customers to be included when transmitting Central Billing for this configuration; leave empty to include all customers that satisfy the other criteria
- Inactive: Tick the checkbox to make this configuration inactive so it no longer appears in the list of available configurations when sending your Central Billing data
Depot Order Configuration
Depot Orders are used to generate a list of products from a particular supplier needed to fulfill your customer orders. For each depot order, you select a Depot Order Configuration to be used to:
- Specify the supplier
- Provide your account details for depot orders sent electronically
- Filter which customers are to be taken into account when generating depot orders using this configuration
- Select other options such as the usual pickup time, whether product reserve quantities should be added when generating a depot order, and the stock location where depot orders using this configuration will be loaded
- Note:
- Each of your suppliers must have a separate Depot Order Configuration, as each depot order is restricted to products from a single supplier.
- You may have multiple configurations for the same supplier if, for example, you do separate depot orders for each stock location and/or customer round
- Depot Order Name: up to 20 characters; must be unique
- Supplier Account Number: this is your account number with your supplier so they can identify you
- Vendor Pin: this is provided by your supplier. Only applicable to some suppliers and can remain blank if not used by your supplier.
- Pickup Time: Enter the expected pickup time of your depot order
- Customer From and Customer To: Select a range of customers to be included when generating a Depot Order for this configuration; leave empty to include all customers that satisfy the other criteria
- Add Reserve Qty: when this option is enabled, when doing a depot order it will add your reserve quantity to the quantity required based on customer orders.
- The reserve quantity you require to have on hand, if any, is set in the Product Details for each product
- Example: if your reserve is 5 and 98 are required for your Orders to be fulfilled, it will default to 103 as the order quantity
- Message: a message that will be included in the depot order file sent to your supplier
- Supplier: Each depot order generated using this configuration will be limited to this supplier's products only; must be selected from the list
- Billing Method: if you want to filter the Billing Method, you can select one or more billing methods and only customers with the selected billing method(s) will included when calculating this Depot Order
- Round: if you want to filter the rounds, you can select one or more rounds and only customers within the selected round(s) will be included when calculating this Depot Order
- Stock Location: you can have multiple locations of where the stock is stored, for example a Truck or cool room; select a location if required for advanced stock control purposes; the order will be loaded into that stock control location
- Customer Group: Select a customer group if you wish to include only customers in that group when generating a Depot Order for this configuration
- Inactive: Tick the checkbox to make this configuration inactive so it no longer appears in the list of available configurations when sending your Depot Orders
Docket Layout Configuration
Use this option to control what displays on the delivery dockets your customers receive. You can have multiple layouts set up, and choose a particular layout for each customer.
- Layout Code: a unique alphanumeric code of up to 5 characters; used to identify the layout
- Display Product Code: choose whether you want to show the vendor product code, supplier product code or no code at all
- Sort By: Products will be printed in the sequence selected, regardless of the Display Product Code
- Vendor Product Code - Products will be sorted alpha-numerically by Vendor Product Code
- Supplier Product Code - Products will be sorted alpha-numerically by Supplier Product Code
- Display Sequence - Products will be sorted first by Category Order, then by Product Display Sequence
- Show Price: either show or hide the pricing on the docket
- Setting applies to dockets for Trade customers
- Dockets for supplier customers (Central Billing and Fee for Service) do not show pricing, as these customers are billed by the supplier
- Show Price Ex GST: when pricing is being shown on dockets:
- If ticked, the docket will display prices ex GST with the headings Unit Price Ex GST and Price Ex GST
- If unticked, the docket will display prices inc GST with the headings Unit Price and Price Inc GST
- Show Crating: either show or hide the number of whole crates/loose for each item on the docket
- Show Signature: show or hide the placeholder for a Customer Signature on the docket
- Show CB: show or hide the customer's current Container Balance on the docket
- Only available if the Container Management feature is enabled
- Inactive: only available if the docket layout isn’t being used for any customers
Email Settings
Configure your email settings to allow invoices, dockets, statements and cut-off time notifications to be emailed from EasyVend.
- To use the EasyVend email server:
- Enter your own email address as the Reply to Email address
- If possible, use your own domain email address or ISP email address rather than a public email address such as a Google or Yahoo address
- Untick Use own email server?
- Click Save Changes
- Note:
- Emails sent to customers will display as From EasyVend at mailer@easyvend.com.au
- When a customer replies to your email, the reply will be addressed to the email address you enter.
- Enter your own email address as the Reply to Email address
- To use your own email server:
- Enter your own email address as the Reply to Email address
- If possible, use your own domain email address or ISP email address rather than a public email address such as a Google or Yahoo address
- Enter the Display Name that you wish to use as your From name
- Tick Use own email server?
- Enter the server settings
- Note that Port 25 is not allowed as it is often blocked by ISPs as a potential source of spam
- Click Save Changes
- Notes:
- Emails sent to customers will display as From the Reply to Email address and Display Name your enter
- Be aware that most ISPs and public servers such as Gmail set limits on the number of emails you can send in a 24-hour period. If you use the server settings of your ISP or a public server, you may exceed those limits when sending bulk invoices etc.
- We recommend you use the EasyVend server unless your own mail server is configured to allow the sending of bulk email
- Enter your own email address as the Reply to Email address
- Reply to Email: enter the email address to which you want replies to your emails to be sent
- If possible, use your own domain email address or ISP email address. Public servers such as Google and Yahoo may have authentication procedures that prevent emails sent via a third party such as easyvend.com.au from being delivered, or they may be flagged with a warning message.
- Display Name: your From name that appears when sending an email using your own server
- Use own email server?: Tick this option to send emails via your own email server
- If this option is ticked, in addition to entering your From Email and Display Name, you will need to provide your server details:
- Server Host: Host address or SMTP address – supplied by your ISP
- Port Number: email port number – supplied by your ISP
- User Name: Email server username
- Password: email server password
- If this option is not ticked, the Easyvend email server will be used
- If this option is ticked, in addition to entering your From Email and Display Name, you will need to provide your server details:
- Send Test Email: Click this button to send a test email to yourself to check your settings are correct
- When clicked, a window opens enabling you to enter the email address to which the test email should be sent
- Click Send
Email Templates
Manage the wording of emails sent to your customers from EasyVend when emailing.
Templates can contain [PlaceHolder] fields in square brackets. These will be filled in with the relevant information when the email is sent and must not be altered. Click Insert Placeholder to select an item to be inserted into the text. Most placeholders have self-explanatory names.
- Invoices, dockets or statements
- Notes on the Invoice templates:
- Invoice Notification
- This template is used for emailing individual invoices to customers
- The Insert Placeholder options allow you to insert invoice details such as amount, date and invoice number into the body of your email
- If you have the payment gateway set up, the Invoice Notification template can also include the [PayNow] placeholder which inserts a large Pay Now button in the body of the email. When the customer clicks the button, they are taken to a website where they can enter their debit/credit card details to pay the invoice.
- This template is used:
- In the Invoices menu option when:
- Generate Invoices automatically emails each invoice as it is created to customers who usually receive invoices by email
- Customers will receive these automatic emails if the Email option is ticked in the customer's Contact Methods
- These emails are sent automatically and the wording will be as determined by the template
- An invoice is emailed by selecting it from the Invoices list and clicking Email
- When emailing an invoice in this way, the Send Email window is displayed; the default wording from the template can be changed before the email is sent
- Generate Invoices automatically emails each invoice as it is created to customers who usually receive invoices by email
- In the customer's Customer tab when:
- Generate Invoices is used to create the invoice and the customer usually receives invoices by email
- Customers will receive these automatic emails if the Email option is ticked in the customer's Contact Methods
- These emails are sent automatically and the wording will be as determined by the template
- Generate Invoices is used to create the invoice and the customer usually receives invoices by email
- In the Invoices menu option when:
- Customer Invoices Notification
- This template is for the email that is sent to a customer when one or more invoices are selected for emailing in the customer's Invoices tab
- As multiple invoices can be selected, this is a more general template that may, for example, be used to email copies of paid invoices, or to email only unpaid invoices as a reminder to the customer
- When emailing selected invoices in this way, the Send Email window is displayed; the default wording from the template can be changed before the email is sent
- Invoice Notification
- Notes on the Invoice templates:
- Notifications of Automatic Direct Debit success or failure, and Online Order Registrations (if these options are enabled)
- The Insert Placeholder options allow you to insert details such as invoice amount etc into the body of your email
- Direct Debit Success Notification template has additional placeholders:
- [AttachmentMessage]: Inserts the following, with the second sentence only appearing if an additional card surcharge has been incurred.
Please find attached a receipt for your payment of $xxx.xx on dd mmm yyyy. [Also attached is a Tax Invoice for the payment surcharge.] - [DebitAccount]: Inserts the account that was debited in abbreviated form such as "Credit Card end with ...123"
- [DebitAmount]: Inserts the amount paid
- [AttachmentMessage]: Inserts the following, with the second sentence only appearing if an additional card surcharge has been incurred.
- Direct Debit Success Notification template has additional placeholders:
- See The Payment Gateway, Online Website and Customer Order Portal for more details
- The Insert Placeholder options allow you to insert details such as invoice amount etc into the body of your email
- Direct Debit Agreement, Terms & Conditions, and Privacy Policy
- When the payment gateway is enabled, these documents can be emailed to the customer using the Direct Debit Agreement option in the customer's Payment Options tab
- Notes:
- If you already have your Terms & Conditions and Privacy Policy published on your website, you should modify the Direct Debit Agreement template to include a link to those documents.
- If you do NOT have your Terms & Conditions and Privacy Policy available on a website:
- Update the sample templates provided to suit your company policies
- When emailing the Direct Debit Agreement to a customer, tick the option to Attach Terms & Conditions and Privacy Policy
For each of the templates, click Edit to open the template editor:
- Subject: define the subject line of your email
- Body:
- Edit and format the text of the email as required
- Placeholders can be used to insert information from your data such as your company name, the customer's name, the invoice number/amount/date of the invoice being emailed or paid etc. To insert a placeholder:
- Position the cursor where you want to insert the placeholder
- Click Insert Placeholder
- Select from the list of available placeholders for the current template
- Click Save Changes when you are happy with the changes to the template
- Note: When emailing dockets, invoices and statements, they will be attached to the email as a PDF file
General Settings
- Timezone: select the Timezone that you are located in
- Enable Container Deposit Scheme: Tick this option if you require CDS to be calculated on your products. If this option is disabled you will not see a column for CDS in your products.
- Deposit Amount: Enter the CDS amount required to be added to prices when CDS is enabled and Subject to CDS is ticked in the product's current price record
- Show Rebate Amount on Order: When this option is ticked, an extra Rebate column is added to the customer orders details screen in My Orders, showing the total rebate (if any) on each product in the order.
- Search Products By: Choose whether to search products by the EasyVend product code (Vendor Code) or by the supplier's product code (Supplier Code). This setting applies to:
- Editing an order in My Orders
- Quick Entry Orders
- Weekly Order Edit
- Editing a customer's Standard Order
- Editing a customer's Rebates
- Hide inactive customers when creating new order, new receipt: If this option is ticked, customers who have been marked as Inactive are hidden when:
- Creating a new receipt
- Creating a new customer order in My Orders, Quick Entry Orders or Weekly Order Edit
- Enable order item - description editable in order form: If this option is ticked, when entering products in the My Orders screen:
- The drop-down list for selecting a product is moved to the Product Code column rather than the Description column
- You can still search for products in the drop-down list by entering a partial product code or partial description
- Once a product is selected, the default description will be displayed
- The Description of the product for the current order can be edited
- Note: This option allows you to annotate the product for the current order entry only (for example, to note that it is a substitute product). It should NOT be used to change to an entirely different product, as the product code is still used to determine things such as stock levels, cost price and whether GST applies to the product.
- If the description of a product is updated, products with an updated description are listed separately from the original product on:
- Delivery Dockets
- Invoices, and
- The following Run Reports:
- Daily Load Summary Report
- Run Sheet For Delivery Report
- Weekly Run Sheet Report
- Other reports continue to be based on the product code; products with a modified description will be included under the original product code/description
- The drop-down list for selecting a product is moved to the Product Code column rather than the Description column
- Enable Order Qty and Substitute in Order: This option enabled two new columns when entering Products on an Order:
- Order Qty: This column allows you to record the Quantity Ordered by the Customer where it differs from the Quantity Delivered
- Substitute: This column allows you to record if the Product is a Substitute for a different Product that was Ordered
- Enable Batch Number Tracking in Order: Allows you to record batch numbers for individual order items, giving full visibility of which batches were delivered to which customers. Batch numbers can represent bottled water production codes, packaging runs, or any tracking identifier used by your supplier. Once enabled, a Batch# column will appear in the My Orders screen for every product line.
- Recording Batch Numbers in Orders:
- Go to Orders > My Orders.
- Open or create a customer order.
- In the order grid, enter the Batch Number for each product in the Batch# column.
- Click Save Changes.
- Recording Batch Numbers in Orders:
- Dashboard Sales Graph includes Customers: This option allows you to restrict the Dashboard Sales Graph to include only Trade Customers, or All Customers
- Advanced Stock Control Mode: This option allows you to set how Stock Locations are treated in Advanced Stock Control:
- Base Location and Trucks: Default. The default 'General Stock' base location will be used as your primary location for Advanced Stock Control with all other locations being loaded and unloaded from that location. Depot Orders can still be for a specific Stock Location, but 'On Hand' amounts will not be calculated where it is not the Base Location.
- Multiple Base Locations: The default 'General Stock' base location will no longer be used, and each Stock Location will be treated as a base location instead. This will allow On Hand amounts to be displayed for each location when creating Depot Orders, but will remove the ability to load and unload stock from the base location in Advanced Stock Control.
-
Disable Auto-Debit for Customer if Card is Declined: This option will automatically suspend Auto-Debit for any customer whose card payment is declined. This prevents repeated failed transactions and unnecessary gateway fees.
- When a card payment fails, the customer’s Auto-Debit status changes to Suspended.
- Auto-Debit will reactivate automatically once a manual or successful payment goes through.
- You can check or update a customer’s Auto-Debit status in Customers > Payment Options.
- Order Fee: The Order Fee allows you to set a fee that can be manually or automatically added to a customer's Order. You are able to set the Description, Amount and whether GST applies to the fee.
The Order Fee can only be added automatically to Online Orders from E-Commerce Websites, Standard Order Import, and manually added Orders.
It will not be added automatically to Orders from the EasyOrder mobile app and Online Orders from non-E-Commerce Websites.
Note: The Order Fee will need to be added manually for Orders created through MiniVend.
- Automatically Add Fee to Order
- Disabled: The feature is disabled and the Order Fee cannot be added to Orders
- Selected Customers: The feature is enabled and can be configured on individual Customers and added to Orders manually
- All Customers: The feature is enabled and applies to all Customers by default. This can then be disabled on individual Customers as needed
- Fee Description: The Description of the fee. This will appear on Dockets and Invoices
- Fee Amount (Ex GST): How much should be charged for the fee, excluding GST (This can also be adjusted on a per-Customer basis)
- Apply GST: Whether or not GST applies to the fee
- Disable EasyOrder Mobile App Access: Enabling this option will prevent customers from logging in to the EasyOrder Mobile App. They will still be able to log in through your EasyVend integrated website
- Automatically Add Fee to Order
- Supplier-specific Settings:
Note: These options will only be visible if required by your supplier
- Picking Route Code List:
- Enter your Picking Route Codes as a comma-separated list, with no spaces (e.g. 234,237)
- Click Save Changes
- Your Picking Route Codes will then be available for selection from a drop-down list when entering Route Codes in:
- Rebate Request Email: Enter the email address of your supplier sales/territory manager
- If this option is enabled for your supplier:
- The email address entered here will be used as the default when sending a Rebate Request email for a Trade customer
- In the Customer detail screen, Trade customers will have a Rebate Request button in the Customer tab. This option is not available for other customer Billing Types or for Net Pricing vendors.
- To request a rebate for the customer:
- Click the Rebate Request button to open the email window
- The Email To address will be the default Rebate Request Email address
- The address can be edited if no default is entered, or you wish to send the request to a different address
- Edit the email message if required
- Click Send to email the request to your sales/territory manager
- If this option is enabled for your supplier:
- Supplier Customer Order Notification Email: Email address for notifications when a customer places a new order through your supplier's Order website.
- Enter your email address to receive email notifications when your customers place new orders via your supplier's online ordering website
- You can enter more than one address separated by a comma
- Enable Auto Update Cost and List Pricing from supplier:
- Tick this option to enable automatic updating of product Cost and List prices from your supplier (in test)
- Net Pricing Vendors: For Net Pricing Vendors, only Cost Price is automatically updated; List Price is not updated
- Picking Route Code List:
Invoice & Docket Messages
Messages appear at the bottom of invoices and/or dockets, above the invoice and docket footers. You can have multiple different messages set up, but only one message can be printed at a time. You can select one message to be printed on dockets, and a separate message to be printed on invoices, when adding or updating customers.
- Code: Up to 3 alphanumeric characters; must be unique
- Message: Enter the message you want to appear on a docket or invoice; can consist of multiple lines
- Inactive: messages can be marked as inactive if they are no longer required
- Messages marked as Inactive will no longer be printed on invoices/docket
- Messages marked as Inactive will no longer be printed on invoices/docket
- Note: You can also create invoice and docket footers, which is text that appears at the bottom of your invoices and dockets respectively, underneath any message you specify in the invoice or docket layout being used.
Invoice Layout Configuration
Use this option to control what displays on the invoices your customers receive. You can have multiple layouts set up, and choose a particular layout for each customer.
- Layout Code: a unique alphanumeric code of up to 5 characters; used to identify the layout
- Display Product Code: choose whether you want to show the vendor product code, supplier product code or no code at all
- Sort By: Products will be printed in the sequence selected, regardless of the Display Product Code
- Vendor Product Code - Products will be sorted alpha-numerically by Vendor Product Code
- Supplier Product Code - Products will be sorted alpha-numerically by Supplier Product Code
- Display Sequence - Products will be sorted first by Category Order, then by Product Display Sequence
- Show Docket Number: either show or hide a list of docket numbers issued to the customer on the invoice
- Show PO Ref: either show or hide the PO reference on the invoice
- Show Past Due: either show or hide a summary of any invoices still outstanding including any payments that have been made since
- Show Unpaid Invoice: shows a list of outstanding invoices at the bottom of the invoice
- Credit Note: negative invoices will print as credit notes instead
- Show BPay: not yet implemented
- Show CB: show or hide the customer's current Container Balance on the docket
- Only available if the Container Management feature is enabled
- Inactive: only available if the invoice layout isn’t being used
Label Printing Settings
Use this option to select the information to be printed on delivery labels when using the Print Labels option in the Orders menu.
- The labels used are Avery L7159 Address Labels, 64 x 33.8 mm, 24 per sheet
Each label prints three lines as selected in these settings. To set up the contents of your labels:
- Line 1, Line 2 and Line 3:
- For each line you can enter plain text to be printed or select a [Placeholder]
- If you enter plain text for a line, it will be printed exactly as you enter it here
- The default for Line 1 is your name as plain text, but you can substitute different text or select a placeholder
- If you select a placeholder from the drop-down list:
- When printing, the placeholder will be substituted with actual data for each customer
- Be sure to not change the placeholder itself accidentally once selected
- Placeholders available are:
- [CustomerName]
- [CustomerAddress]
- Prints the customer's delivery address
- [CustomerPhone]
- Prints the first phone number it finds in customer details: Phone Number -> Mobile -> Mobile2
- [Order# Package#]
- Prints the Order Number and This Package/Total Packages, where Total Packages is the number of labels being printed, as specified for each customer in the Label Count column of the Print Labels screen (e.g. 1/4, 2/4 etc)
- Weight per Pack:
- Enter the weight in kilograms to be used when calculating the default number of labels to be printed for each customer
- The default number of labels is calculated by dividing the total weight of the customer's order by the Weight per Pack specified here and rounding up
- The actual number of labels printed for each customer can be adjusted before printing by updating the number in the Label Count column of the Print Labels screen
Click Save Changes once you are happy with your settings.
Picking Location
This option enables you to:
- Create a list of picking locations such as "Chiller1-R3A"
- Assign a picking location to each product in My Products
- When assigning a Picking Location to a product, you can either select from this list of picking codes, or type in a location not in the list
- Note: When printing the Run Sheet for Picking Report, only picking locations added in the Picking Location list here can be used to filter the report by picking location. If a product has a picking location that is not in the list, you cannot filter for that location.
- When assigning a Picking Location to a product, you can either select from this list of picking codes, or type in a location not in the list
- Print a Run Sheet For Picking Report from Run Reports each day
- Location Code: a unique alphanumeric code of up to 20 characters
- Inactive: tick to make a picking location inactive so that it cannot be selected when entering a picking location for a product
Price Levels
These are used to manage different selling prices of products when selling to different types of customer (wholesale price, supermarket price, retail price etc). You can create up to 24 price levels, setting each price level above or below the cost or list price of each product, using either a percentage or a dollar adjustment amount.
- Price levels should be created before adding products and customers
- In the product screen, when you add the cost and list prices for a product, the selling price for each price level is displayed
- When adding customers, you assign a price level to each customer to determine how the selling price of your products will be calculated for that customer
- Note: You can further refine the price of a product for an individual customer by using Standard Orders to add an additional adjustment to a product's price
- Note: You can further refine the price of a product for an individual customer by using Standard Orders to add an additional adjustment to a product's price
- Code: select from the drop down list to allocate a code to the price level
- Description: this is the name of the price level e.g. Wholesale, Retail etc.
- Adjustment: enter the markup or markdown as either a dollar and cent amount, or a percentage
- Percentage: tick this option if the adjustment that you entered is a percentage
- If the percentage box is unticked, the adjustment you entered is treated as a $ adjustment
- Cost Based: tick this option if the adjustment is to be applied to each product's Cost Price
- Leave this option unticked if the adjustment is to be applied to each product's List Price.
- Leave this option unticked if the adjustment is to be applied to each product's List Price.
- Example 1:
- Type in an Adjustment of -1
- Leave Percentage and Cost Based unticked
- The selling price for this price level will be a mark down of -$1.00 on each product's list price
- Example 2:
- Type in an Adjustment of 10
- Tick both Percentage and Cost Based
- The selling price for this price level will be a mark up of 10% on each product's cost price
Product Categories
These are used to group your products in categories (e.g. White Milk, Flavoured Milk, Cream, Skim Milk, Juices, Cheeses etc). Each product should be assigned to a category. Categories are then used to group products in the online customer order portal, and can be used when printing reports for sales analysis.
- Description: enter the description of the category
- Online Order: if this option is unticked, products belonging to this category will not be available for online ordering via your website. For example, if you wish to exclude bulk products, you would create separate product categories for these.
- If you wish to exclude certain bulk products from all online ordering:
- Create a new product category:
- Description: "Bulk White Milk" or similar
- Online Order: Unticked
- Save the new category
- For each white milk product to be excluded from online ordering, assign it to the new category
- Create any other bulk categories such as "Bulk Cheese" etc if required
- Create a new product category:
- Categories that are unticked for Online Order can still be displayed for individual Customers using the Offline Categories Exception option in the Customer's Website tab
- Note: If you only wish to exclude products from online ordering for selected customers, the Website tab in the customer details screen allows you to select product categories to be excluded from online ordering for that customer.
- See The Payment Gateway, Online Website and Customer Order Portal for more information on setting up online ordering
- If you wish to exclude certain bulk products from all online ordering:
- Inactive: tick this option to mark the category as Inactive so it doesn't appear in the drop-down list when assigning a category to a product
- if the category is being used, it cannot be deleted, but it can be marked as inactive.
- Order: If required, you can change the order in which the product categories are listed in a drop-down list. Either:
- click and hold the
 icon to drag categories up or down the list and drop them in the required position, or
 - manually type a sort order number into the Order field
- click and hold the
If there are no products associated with a category, the icon is enabled and the category can be deleted. When deleting a Product Category, the category is also removed from the Website tab for any customers who have that category as a Restricted Category.
Rebate Claim Configuration
This is used within the Rebate Claim screen for distributors who claim rebates from their supplier. You can have multiple configurations, but each configuration applies to a single supplier.
- Config Name: up to 20 characters; must be unique
- Supplier Account Number: this is your account number with your supplier so they can identify you
- Supplier: Each Rebate Claim file generated using this configuration will be limited to this supplier's customers only; must be selected from the list
- Inactive: Tick the checkbox to make this configuration inactive so it no longer appears in the list of available configurations when sending your Rebate Claim data
Report Settings
Report Settings
Company Logo: Used to upload the logo image that will be printed on invoices, dockets and the customer order pad
- Click Edit to open the Company Logo window
- If you have already uploaded a logo, it will be displayed
- Take note of the recommended image dimensions; use an image of this size for best results
- To add a logo, or replace the existing logo, click Upload
- A file selection window will open, enabling you to select your logo image from your computer
- Images must have a file type of PNG, JPEG, or JPG
- After selecting a logo, it will be displayed in the window
- If you are happy with the image displayed, you can press x to close the window
- If you are not happy, click Upload again to upload a different image, or Delete to remove the uploaded logo
Invoice Templates
Invoice Footer: text entered in this section will appear on all your tax invoices, underneath the invoice message
Statement Footer: text entered in this section will appear on all statements
- Click Edit to open the template editing window for the template you wish to update
- Type and format the text you require
- Click Save Changes
Docket Templates
Docket Footer: text entered in this section will appear on all your dockets, underneath the docket message
- Click Edit to open the template editing window
- Type and format the text you require
- Click Save Changes
Hide ABN/GST No in header: Hides the ABN (or GST No. for New Zealand) in the header of dockets
Bank Deposit Slip Templates
Bank Deposit Slip Footer: text entered in this section (for example, your bank account details) will appear on all your bank deposit slips, below the Cash Breakup table.
- Click Edit to open the template editing window
- Type the text you require
- Click Save Changes
Depot Order
Show Order Cost at Depot Order Report: tick this option if you wish the Depot Order Report to show the cost of the Depot Order (including GST and CDS where applicable).
- After creating and saving a Depot Order, click the Preview Order button to generate the Depot Order Report
- If Show Order Cost at Depot Order Report has been ticked, the report generated will include the cost for each product and the total cost of the depot order
Rebate Report Header
Rebate Report Header: When the Rebate Report in Sales Reports is printed for Fee for Service or Central Billing customers, the default heading for the report is Franchise Owner Claim Form. You can change this heading by entering new text here.
- Click Edit to open the template editing window
- Type the text you require for the report heading when printing a Rebate Report for Fee for Service or Central Billing customers
- Click Save Changes
Return Reason Codes
Reason codes are generally used by the distributors who send central billing to their supplier to define the reason for return stock (e.g. Damaged goods, Short dated etc).
- Code: a unique alphanumeric code of up to 3 characters
- Description: a name used to describe the return reason
- Inactive: tick to make a return reason inactive so that it cannot be selected when entering returned items in orders
- Some suppliers have limitations on which reason codes can be accepted.
- If you enter a negative quantity in an Order, you will be required to select a Return Reason from this list
Rounds
Rounds are usually defined for a delivery area or truck route (e.g. CBD Route, West Route, Morning Round). Each customer can be allocated a default Round in the customer screen. This default is used when creating orders for the customer, but each order can allocated to a different Round in the Orders screen. This is useful if you have morning and afternoon rounds, and a customer has two orders for the day.
- Round Code: a unique alphanumeric code of up to 5 characters
- Description: an alphanumeric name used to describe the round
- Route Code (Depot Order): only visible if required by your supplier
- Select the code for this Round from the drop-down list
- Route Codes available in the drop-down list should first be entered in the General Settings section
- If your supplier uses Route Codes, the code entered here is used for Depot Orders
- If a different Route Code is used for Central Billing, it is entered at the customer level in the Rounds and Groups section on the Customer details tab, and/or in the Picking Route section of the Options tab
- Select the code for this Round from the drop-down list
- Inactive: tick to make a round inactive so that it cannot be selected when assigning a default round to a customer
- Customers: displays a count of the number of customers in this Round
- Note that the delete icon is disabled and the item cannot be deleted if the Round is used for either one or more customers OR for one or more orders.
Stock Locations/Trucks
The locations where you hold stock are defined here. You initially have one location that is your main or Base Location. You can rename this location if required (e.g. you might want to rename it to 'Cool Room'), and add multiple other locations such as Truck 1, Truck 2. Locations/trucks are used for MiniVend deliveries, depot orders and advanced stock control.
- Description: a description of the location e.g. Truck or Cool Room
- Is Base Location: this will be ticked if this is the main location of your stock; you can only have one Base Location
- Is MiniVend: If you use MiniVend, tick this option for each Stock Location/Truck using MiniVend
- The number of Stock Locations/Trucks that can be used with MiniVend is limited to the number of subscribed MiniVend devices
- Inactive locations marked as using MiniVend are not counted when determining this limit
- The Base Location cannot be used as a MiniVend truck location
- The number of Stock Locations/Trucks that can be used with MiniVend is limited to the number of subscribed MiniVend devices
- Inactive: tick to make a location inactive so that it cannot be used when creating a depot order
Website Settings
Cutoff Times | Cutoff Notifications | Vendor Holidays | Promotional Message
If you have subscribed to the the Online Website module of EasyVend, these sections enable you to select site options, edit the templates for emails sent to your customers using online ordering, set cut-off times for orders, and mark days you will not be delivering. See The Payment Gateway, Online Website and Customer Order Portal for more details on setting up online ordering and inviting customers to use the online Order Portal for placing orders and paying invoices.
Site Settings
- Online Website URL: If you have the Online Website module of EasyVend, this is the address of your orders website; the address is set by the JealTech staff when you subscribe to the module and is display only
- Enable Online Payment: If you have the payment gateway enabled, you must tick this option to enable online payments in your customer order portal and the EasyVend Orders app. When ticked:
- Customers can pay outstanding orders and invoices by entering their card details online
- Customers who are over their credit limit are required to pay the order by credit or debit card before a new order can be submitted.
- The customer's specific pricing will be shown for each product and cannot be hidden
- Show Photo Column: On the products and ordering pages of your website and in the EasyVend Orders app, you can show or hide a photo of the product if it is available.
- Show Prices: On the products and ordering pages on your website, you can show or hide pricing of products. When ticked:
-
Pricing for products is only shown when the customer is logged in
- Logged in customers see pricing specific to them
- Pricing cannot be hidden when online payment is enabled
-
- Show Prices without Login: E-Commerce Websites Only. Prices will be displayed on your website to all visitors, even those who are not logged in.
- Customers who are not logged in will see the List Price for products
- This option must be enabled to set Registration and Checkout Option to Level 3
- How many days can be ordered in advance: Choose how many days in advance a customer can place an order when placing an online order
- Vendor Order CC Email: If you enter a valid email address here, when a customer places an order via your online order portal or the EasyVend Orders app, a copy of the confirmation email for the order will also be sent to you at this email address
- Leave blank if you do not want to receive email confirmations when orders are placed via the online order portal/EasyVend Orders app
- Enable Email Notification on Order Modification and Cancellation: when enabled, EasyVend will automatically send an email to the entered address(es) whenever a customer changes or cancels an order via the online portal or EasyVend Orders app.
- The email includes the customer's name, order number, and a summary of the changes or cancellation.
- Notifications are sent only for orders updated before the cutoff time.
- Leave this field blank if you do not wish to receive notifications for order modifications or cancellations.
- Registration and Checkout Option: Sets how Online Order Registrations are handled as well as whether a customer can place an online order without needing to have an account:
- Level 1: Default. An account is required to place an order, account registrations must be approved by the vendor
- Level 2: An account is required to place an order, account registrations will be approved automatically
- Level 3: E-Commerce Websites Only. Customers can proceed through the checkout without requiring an account, account registrations will be approved automatically
- Show Prices without Login must be enabled to select this option
- Delivery Date Not Required for Customer Orders: Tick this option if online customers are not required to select a delivery date when placing an order.
- Orders submitted without a confirmed delivery date must be reviewed and confirmed by the vendor in My Orders.
- To review these orders:
• Select My Orders from the Orders menu
• Tick Not-Confirmed Order Only
• Click Search
• Open the order and review its details
• Click Confirm Order - Once the order has been confirmed, it will no longer be included when filtering by Not-Confirmed Order Only.
EasyVend Order
- EasyVend Order Logo: Upload your company logo to be displayed on the Version 1 Online Order Portal and EasyVend Orders app.
- The maximum recommended dimensions are 150px X 150px
- If your logo exceeds these dimensions, it will be resized to fit within them
- Logo must have a file type of jpg, jpeg, or png
- To upload a logo, or replace the existing logo, click Upload and select the logo file from your computer
- To delete a logo, click Delete
Note: The EasyVend Orders app is linked specifically to the Version 1 Online Order Portal. The app is still operational; however, no further updates or improvements are being made to it.
To enquire about upgrading from the Version 1 Online Order Portal to the E-Commerce Website, please contact JealTech Support on (02) 9188 4470.
Website Email Templates
These templates are used when sending emails related to websites to your customers. Click Edit to view and/or edit a template.
- Reset Password: edit the content of the email sent to a customer when they want to reset their password on your website
- Make sure the template contains the [ResetLink] placeholder, as this inserts the link for the customer to click to reset their password
- Login Invitation: edit the content of the email sent to a customer when you invite them online on your website
- Make sure the template contains the [EmailLink] placeholder, as this inserts the link for the customer to click to set their password
- The template should also contain the [CustomerUserManual] placeholder which will insert a link to a pdf of the customer user manual for online ordering. This will enable your customer to download a copy of the current version of that manual.
- Order Confirmation: edit the content of the email sent to a customer when they have placed an order
- The template should contain the [OrderContent] placeholder, which inserts the order itself
- The template should also contain the [OrderLink] placeholder, which inserts a link to the order on your webstie
Cutoff Times
Cutoff Times | Cutoff Notifications | Vendor Holidays | Promotional Message
Cutoff times are used to control the latest time each day your customers can place their orders using the online order portal.
- Delivery enabled: tick this to allow orders to be placed for the selected day.
- Untick this option if you don’t want customers to be able to place orders for the selected day; cut-off time notifications for that day will also not be sent.
- Notice Required (days): this is the number of days in advance that your customers must place orders.
- Cutoff time: This is the time by which orders must be placed. This works in conjunction with the notice required (days)
- Example: If the notice required for Monday is set to 1 day, and the cut off time is set to 4pm, your customers must place their orders prior to 4pm on the Sunday. After than time, the customer will be unable to select Monday as the delivery date.
Cutoff Notifications
Cutoff Times | Cutoff Notifications | Vendor Holidays | Promotional Message
Cutoff notifications can be used to notify your customers by SMS or email if they have not yet placed an order and it is getting close to cutoff time. See Cut-off Time Notification for an overview of cutoff notifications and details on setting them up for each customer.
Cutoff Notifications
Notifications can be sent manually from the Cut-off Time Notification screen, or they can be automatically sent a predetermined number of minutes prior to the cutoff time.
Automatic notifications are only sent to customers who have Cutoff Time Notification enabled in the Options tab of the customer details screen.
To enable automatic sending of cutoff notifications to your customers:
- Tick the Enable auto send notification checkbox
- Enter the number of minutes before the cutoff time that you would like the notifications sent
- Click Save Changes
Notification Templates
These templates determine the wording of the emails and text messages sent to your customers when notifying them the cutoff time is approaching.
For each of the templates, click Edit to open the template editor. For email notifications, you can edit the subject line and the body of the email. For SMS notifications, you can edit the text of the message to be sent:
- Subject: define the subject line of your email
- Body: Edit and format the text of the email as required
- Placeholders can be used to insert information from your data such as the customer's name, the cutoff time and delivery date. To insert a placeholder:
- Position the cursor where you want to insert the placeholder
- Click Insert Placeholder
- Select from the list of available placeholders for the current template
- Click Save Changes when you are happy with the changes to the template
Burst SMS
To enable SMS notifications, contact the JealTech Support team on (02) 9188 4470. You will need to have ready:
- Your mobile phone number for return messages, or a short sender name
- Your email address
- A temporary password for JealTech to use when setting up your Burst SMS account (you will be able to change this later)
Once a Burst SMS account has been created for you, a confirmation email will be sent with your log-in details. You will need to:
- Login to Burst SMS
- Read and accept the Terms and Conditions of the Burst SMS service
- On the Billing page, add your credit card and select your Auto Credit Re-charge amount if desired
- Update the password on your Burst SMS account to replace the temporary password used when the account was created for you
- If you plan to set a custom Sender Name, within BurstSMS:
- Select "Numbers" from the top-left navigation
- Click "Add Sender ID"
- Fill out the Sender ID Registration form and submit it
If you already have your own Burst SMS account, let the JealTech team know so they can enable your account in EasyVend.
Once Burst SMS is set up, in General Settings you can:
- Enter or change the mobile number for return messages, or, if you do not want customers to be able to reply, enter a short "From" name (a maximum of 11 characters with no spaces)
- Log into your Burst SMS account
Vendor Holidays/Supplement Dates
Cutoff Times | Cutoff Notifications | Vendor Holidays | Promotional Message
Vendor Holidays/Supplement Dates allows you to create and maintain a list of dates containing both:
- Vendor Holiday Dates: Days on which no customers can place an online order
- You can set holiday dates for yourself (e.g. Christmas Day, Anzac Day etc).
- When a holiday date has been added:
- Your customers will be unable to place orders on your website or using the EasyVend Orders app for the selected date, and
- Cut-off time notifications for that delivery date will not be sent
- Supplement Dates: Days on which all customers can place an order on your website
- You can set supplement dates on which customers can place an order even if it is not a usual delivery day for the customer
- Note: Deliveries must also be enabled for that day of the week in the Cutoff Times screen in General Settings
Usage Example
Friday is a public holiday and you will not be making any deliveries on that day. You instead want all customers to order for Thursday delivery, even if that is not their usual delivery day.
- Select the Vendor Holidays/Supplement Dates tab in General Settings
- Create a Holiday entry for the Friday to prevent orders being placed for Friday delivery
- Create a Supplement entry for the Thursday to allow online orders for that day, even for customers who do not usually get deliveries on that day
- If you do not have deliveries enabled for the day of the Supplement Date, select the Cutoff Times tab in General Settings
- Tick Delivery Enabled for the Supplement Date day of the week
- Enter the Notice Required and Cutoff Time
- Click Save Changes
Adding to the list of holiday/supplement dates:
- Date: Enter the date for which you want to restrict/allow the placing of orders on your website
- Type: Select the type of date being added
- Holiday: no customers can enter orders for that date
- Supplement: all customers can enter orders for that date
- Description: enter the label of the holiday
- Click Add
Deleting from the list of holiday/supplement dates:
- To remove an old or incorrect date from the list:
- Click on the unwanted date in the list to highlight it
- Click Remove
Promotional Message
Cutoff Times | Cutoff Notifications | Vendor Holidays | Promotional Message
This option allows you to display messages to customers using the online order portal. There are two types of message:
- Promotional Message: This message will appear at the top of the customer's New Order screen in both the online order portal and the EasyVend Orders app. It can be used for any information you want to display to all your online customers.
- Available for the Version 1 Online Order Portal and the EasyVend Orders app only. Promotional Messages are not displayed on E-Commerce Websites.
- To add a promotional message:
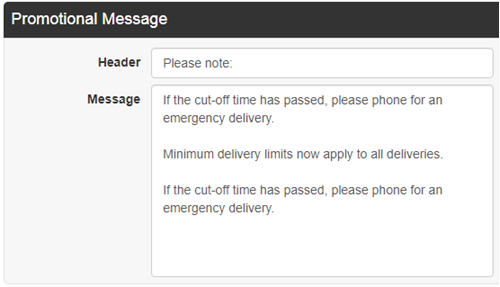
- Header: Enter the heading to be displayed
- Note: Header text is required in order for the message to appear
- Message: Use the edit box to enter your message
- Click Save Changes
- Header: Enter the heading to be displayed
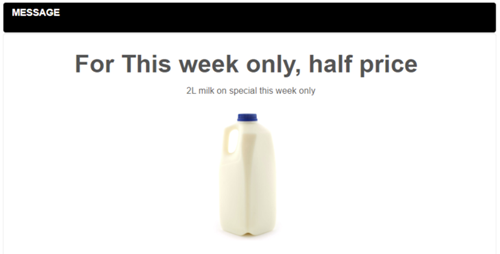
- When customers log in and display the New Order screen, they will see the message at the top of the screen:
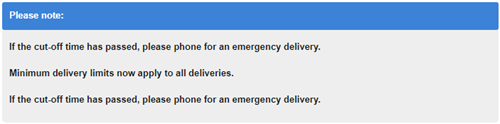
- As promotional messages appear above the fields used by the customer to enter order details, it is best to limit the vertical space they take up.
- To edit the promotional message, just make your changes and then click Save Changes
- To delete the promotional message, delete the Header text (and the Message text if desired) and click Save Changes
- To add a promotional message:
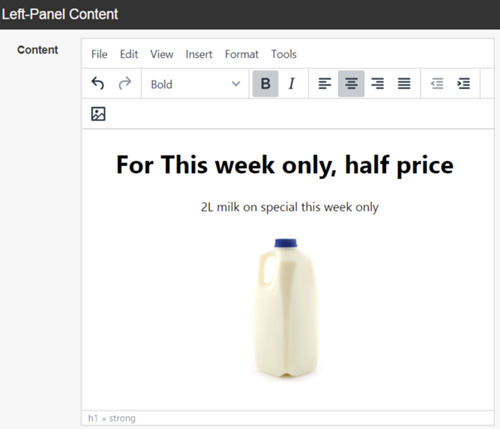
- Left-Panel Content: This option can be used to display text and/or images on the left-hand side, below the customer's menu, in your website's online order portal.
- Available for both the Version 1 Online Order Portal and E-Commerce Websites.
- To add left-panel content:
- Use the edit box to enter text and/or images and use the formatting tools to make the message appear as you would like
- To add an image:
- Click the
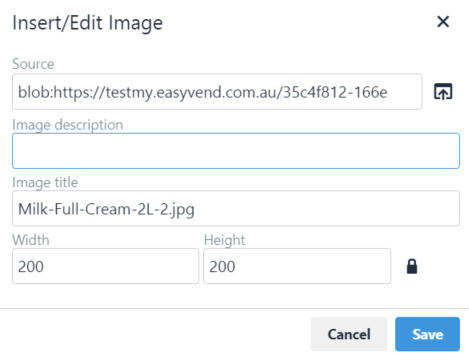
 image icon (or select Image from the Insert menu) to display the Insert/Edit Image window
 - Source: Click the
 upload icon and select an image from your computer
 - Image description and Image title: These are not displayed to the customer, but can be useful if you need to know the name of the image on your own computer
- Width and Height: There is no need to update these settings - images are resized automatically by EasyVend to fill the available space
- Click Save
- Click Save Changes to save the new left-panel content
- Click the
- To delete an image: Click on the image and click the <delete> key
- Use the edit box to enter text and/or images and use the formatting tools to make the message appear as you would like
- Click Save Changes once you are satisfied with your message
- When customers log in and display the New Order screen, they will see the message on the left-hand side, below the menu
- To add left-panel content: