The Invoices option in the Customer menu is where invoices are generated and is the main screen for printing, emailing and viewing invoices for all customers.
When this option is chosen, a list of Invoices is displayed. You can search and sort this list, generate new invoices, print and email invoices, or select an invoice to view its details.
Apart from generating invoices via this screen, an invoice is also generated:
- By clicking Create Invoice for an individual order in the My Orders details tab
- Using the Generate Invoice button in the customer details screen
- When a customer pays for an un-invoiced order via the online customer order portal. When the receipt for the un-invoiced order is added via the payment gateway, an invoice for that order is created and the receipt is allocated to it.
Overview of Invoices in EasyVend
- Batches of invoices based on the customers' orders are generated by selecting the Generate Invoices button in the Invoices list and specifying the invoices to be generated
- Emailing invoices automatically: For customers who usually receive invoices by email, Generate Invoices also automatically emails each invoice as it is created
- These automatic emails are sent to customers who have the Email option ticked in Contact Methods in their Customer Information
- The Invoice Notification email template in General Settings is used for the wording of the automatic emails
- See Invoice Settings below for more details
- Printing invoices: Once generated, Batch Print is used to print invoices for those customers with the Print option ticked in Contact Methods in their Customer Information
- Invoices for an individual trade customer can also be generated via the Generate Invoice button in the customer details screen
- This option would be used if, for example, you wanted to generate a final invoice for a customer
- Any invoices that are due to be generated up to and including today's date are created
- This option obeys:
- the Days Between Invoices and Next Invoice Date set in the customer's Billing Information, and
- the automatic emailing of invoices if the Email option is ticked in Contact Methods in their Customer Information
- The Invoice Notification email template in General Settings is used for the wording of the automatic email
- See Invoice Settings below for more details
- The Invoice Notification email template in General Settings is used for the wording of the automatic email
- See Customers for more details on using the customer Generate Invoice option
- Invoices for a trade customer's individual order can also be generated by clicking the Create Invoice button in the order details tab of the My Orders screen
- This option would be used if, for example, you wish to enter your orders each day and immediately produce an invoice for the customer as each order is entered
- The invoice is produced as a pdf which can be viewed, printed or emailed
- Invoices can be individually printed or emailed at any time from the Invoices list:
- In the Invoices menu option:
- Select the invoice from the Invoices list
- Click Print or Email as required
- Note: When emailing an invoice using this option:
- The Invoice Notification email template in General Settings is used for the default wording of the email
- The default wording can be changed before the email is sent
- If you wish to attach other documents in addition to the invoice that is attached automatically, Choose Files in the email window allows you to select the additional document(s) from your computer
- When printing or emailing fully paid invoices, they clearly marked with a red Paid stamp
- In the Invoices menu option:
- Invoices can also be printed or emailed from the customer's Invoices tab:
- Email: Multiple invoices can be selected for emailing to the customer:
- In the customer's Invoices tab:
- Tick the checkbox in the Email column for each invoice to be emailed
- Click Email
- All selected invoices are sent as PDF attachments in the email
- Notes:
- The Customer Invoices Notification email template in General Settings is used for the default wording of emails sent from the customer's Invoices tab
- The default wording can be changed before the email is sent
- If you wish to attach other documents in addition to the invoice that is attached automatically, Choose Files in the email window allows you to select the additional document(s) from your computer
- In the customer's Invoices tab:
- Print: Click the
 icon on the right of an invoice to open a menu that allows you to cancel or print the invoice
 - When printing or emailing fully paid invoices, they clearly marked with a red Paid stamp
- Email: Multiple invoices can be selected for emailing to the customer:
- If you use the online web order portal and a customer pays for an un-invoiced order via the payment gateway, an invoice is automatically generated for that order and the receipt allocated to it
- One-off invoices, not based on orders, can be created by going to a customer's Invoices tab and selecting New Invoice
- Bad Debts can be written off by selecting the unpaid invoice and selecting Write Off Invoice in the invoice details screen
Invoice Settings
- General Settings: Several sections in General Settings in the Settings menu affect the printing and emailing of Invoices:
- Email Settings: Configure your email settings to allow invoices, dockets and statements to be emailed from EasyVend
- Email Templates:
- Modify the Invoice Notification email template to update the subject line and wording of the email that is sent to customers when invoices are emailed from the Invoices menu option or when Generate Invoice is used from the Customer tab in the customer details screen
- This template is used:
- In the Invoices menu option when:
- Generate Invoices automatically emails each invoice as it is created to customers who usually receive invoices by email
- Customers will receive these automatic emails if the Email option is ticked in the customer's Contact Methods
- These emails are sent automatically and the wording will be as determined by the template
- An invoice is emailed by selecting it from the Invoices list and clicking Email
- When emailing an invoice in this way, the Send Email window is displayed; the default wording from the template can be changed before the email is sent
- Generate Invoices automatically emails each invoice as it is created to customers who usually receive invoices by email
- In the customer's Customer tab when:
- Generate Invoices is used to create the invoice and the customer usually receives invoices by email
- Customers will receive these automatic emails if the Email option is ticked in the customer's Contact Methods
- These emails are sent automatically and the wording will be as determined by the template
- Generate Invoices is used to create the invoice and the customer usually receives invoices by email
- In the Invoices menu option when:
- The Insert Placeholder options allow you to insert invoice details such as amount, date and invoice number into the body of your email
- If you have the payment gateway set up, the Invoice Notification template can also include the [PayNow] placeholder which inserts a Pay Now button in the body of the email. When the customer clicks the button, they are taken to a website where they can enter their debit/credit card details to pay the invoice.
- This template is used:
- Modify the Customer Invoices Notification email template to update the the email that is sent to a customer when one or more invoices are selected for emailing in the customer's Invoices tab
- This template is for emailing one or more invoices from the customer's Invoices tab
- As multiple invoices can be selected, this is a more general template that may, for example, be used to email copies of paid invoices, or to email copies of unpaid invoices when following up outstanding amounts
- When emailing selected invoices in this way, the Send Email window is displayed; the default wording from the template can be changed before the email is sent
- This template is for emailing one or more invoices from the customer's Invoices tab
- Modify the Invoice Notification email template to update the subject line and wording of the email that is sent to customers when invoices are emailed from the Invoices menu option or when Generate Invoice is used from the Customer tab in the customer details screen
- Invoice & Docket Messages: Use this option to create messages that can be printed on invoices and/or dockets. For each customer, you can then choose one of these messages to be printed on the invoices for that customer.
- Invoice Layout Configuration: Use this option to control what displays on the invoices your customers receive. You can have multiple layouts set up, and choose a particular layout for each customer.
- Report Settings:
- Company Logo: If a logo is uploaded here, it will be included in the heading of all invoices
- Invoice Templates - Invoice Footer: Edit the Invoice Footer to add text (e.g. payment instructions) that will be printed on all invoices
- Customer Details: In the Customer details screen, both the Customer and Options tabs have settings that affect invoicing for that customer:
- Customer Tab - Customer Information:
- Contact Methods:
- Email: Tick this option to enable automatic emailing of invoices as they are generated from the Invoices option in the Customer menu or using Generate Invoice option the Customer tab of the customer details screen
- Print: Tick this option to enable this customer's invoices to be included when batch printing invoices
- Note: Both Email and Print can be selected if needed
- Contact Methods:
- Customer Tab - Billing Information:
- Days Between Invoices and Next Invoice Date set the frequency of invoicing and when the next invoice is to be printed
- EasyVend does not invoice Central Billing or Fee for Service customers, as they are invoiced by the supplier
- This section is also where you set the Billing Type, Price Level, Credit Term and Credit Limit for each customer
- Note: You can also generate invoices for just this customer using the Generate Invoice button on the Customer tab; see Customers for more details
- Days Between Invoices and Next Invoice Date set the frequency of invoicing and when the next invoice is to be printed
- Options Tab - Invoice Information:
- Nominate various options such as rounding and discount, and select the Invoice Layout and optional Invoice Message to be used for this customer
- Options Tab - Receipt Information:
- If Auto Allocate Receipt is ticked: When a new invoice is generated, EasyVend will check to see if the customer has any unallocated receipts; any existing unallocated receipts will be automatically allocated, starting with the oldest outstanding invoice
- Options Tab - Fee to be added to each invoice
- If required, you can add a description and amount for any fee that is to be added to invoices for this customer
- Customer Tab - Customer Information:
Generating New Invoices
- Select Invoices from the Customers menu, or click Print Invoices in the Dashboard to display the list of invoices already generated
- Click the Generate Invoices button to display the Generate Invoices window
- In this window, you can nominate the invoice date and customers you want included when generating invoices:
- Invoices Due On: Select the date up to which you want invoices created
- Groups: If you wish to restrict invoicing to only some groups, select one or more groups here
- Leave blank to include all groups
- Rounds: If you wish to restrict invoicing to only some rounds, select one or more rounds here
- Leave blank to include all rounds
- Customer Code From and Customer Code To: If required, you can restrict the invoices created to a range of customer codes
- Leave blank to include all customer codes
- Click Generate
- As invoices are created (and emailed, for those customers who have invoices emailed), a running count is displayed
- Only customers with the 'Email' option ticked in their Communication Method in Customer Information are included when batch emailing invoices
- When finished, the new invoices are shown in the invoice list
- Invoices that have been emailed will display the Emailed On date
- After generating the invoices, use Batch Print to view and print the invoices for customers who have invoices printed (see Printing Invoices below for more details)
Notes on Generating Invoices
- Invoices are produced for all un-invoiced customer orders up to and including the Invoices Due On date
- For example:
- You have a daily invoiced Trade customer with a customer order for 5th August
- You generate their invoice for 5th August
- The Next Invoice Date for each customer is rolled over when an invoice is generated, so their next invoice date is now 6th August
- However, when the order is delivered, additional goods not in the invoiced order are also delivered
- There is no need to cancel and re-generate the existing invoice for 5th August. Instead:
- Go to My Orders and add a second order for 5th August for the additional goods delivered over and above their original order
- When you generate an invoice for 6th August, EasyVend will see the second order on the 5th has not yet been invoiced, and will include it on the invoice for the 6th
- For example:
- If invoices have been skipped when generating invoices, EasyVend will 'catch up' by generating the missing invoices
- For example:
- You have a daily invoiced customer
- Their last invoice was on 1st August, and their Next Invoice Date is 2nd August
- The customer has an order for 2nd August, but you simply don't get time to generate invoices that day
- When you generate invoices for 3rd August, EasyVend will see an invoice was missed and will produce invoices for both the 2nd and the 3rd
- For example:
Printing Invoices
- Select Invoices from the Customers menu, or click Print Invoices in the Dashboard to display the list of invoices already generated
- Click the Batch Print button to display the Invoices Batch Print window
- In this window, you can nominate which invoices you want to print:
- Invoice Date: Select the date of the invoices you wish to print
- Only invoices with this Invoice Date are printed
- Print Sequence: Select whether to print in Delivery Sequence or Customer Code sequence
- Groups: If you wish to restrict printing to only some groups, select one or more groups here
- Leave blank to include all groups
- Rounds: If you wish to restrict printing to only some rounds, select one or more rounds here
- Leave blank to include all rounds
- Customer Code From and Customer Code To: If required, you can restrict the printing to a range of customer codes
- Leave blank to include all customer codes
- Invoice Date: Select the date of the invoices you wish to print
- Click Print
- Invoices matching the criteria in the Invoices Batch Print window are produced as a PDF file
- Up to 50 invoices are included in a PDF file; if you are printing more than 50 invoices, a separate PDF will be created for each batch of 50
- See Printing in EasyVend for more information on handling PDF files
- Only customers with the 'Print' option ticked in their Communication Method in Customer Information are included in the print run
- If a customer has more than "1" specified in Number of Invoices to print, the PDF will contain multiple copies of the invoice
- The Printed On date in the invoice list will be updated for invoices included in the batch print
The Invoice List - Searching and Sorting
When you select Invoices from the Customers menu, a list of existing invoices is displayed.
Searching
- To filter the invoice list, enter any combination of the search terms:
- Invoice Number: Enter a specific invoice number to find that invoice
- Date Range: Select From and To dates to show all invoices with an invoice date in that range
- Status: Select from the drop-down list to show only invoices with a specific status
- Any Status
- Active - all invoices except cancelled invoices
- Unpaid - invoices with an amount outstanding
- Overdue - invoices with an amount still outstanding past the due date, as determined by the customer's Credit Term
- Debit Failed - the automatic bank account/credit card debit via the payment gateway for this invoice has failed
- See the Payment Gateway section in Receipts for information on setting up automatic payment of invoices on the due date
- Pending - the automatic bank account debit via the payment gateway for this invoice has not yet cleared
- See the Payment Gateway section in Receipts for information on setting up automatic payment of invoices on the due date
- Paid - fully paid invoices
- Cancelled - an invoice was created but has been cancelled
- Customer Range: Select From and To customer codes to show invoices for customers in that range
- Groups: Select one or more Groups from the drop-down list
- To remove a Group from the search criteria, click the x to the right of the Group name
- Rounds: Select one or more Rounds from the drop-down list
- To remove a Round from the search criteria, click the x to the right of the Round name
- Invoice Amount: Enter a specific invoice amount to find
- Click Search to list invoices that match all your search criteria
- Use the navigation controls at the bottom of the list to set the number of items displayed per page, and to move between pages.
- To select an invoice and display its details, click anywhere on the invoice in the list
Sorting
- Click on a column heading to sort the invoices by that column
- Click the heading again to sort in reverse order
The Invoice Details Tab
When you select an invoice from the Invoice List, the Invoice Details tab allows you to view the details for that invoice, including the receipts(s) allocated to it, if any. From the details screen you can:
- Previous and Next: Use these options to move move back and forward through invoices in the list and view their details
The Current Invoice
- Print: Print the current invoice, even if invoices are not usually printed for this customer
- Email: Email the current invoice, even if invoices are not usually emailed for this customer
- The Send Email window is displayed; this enables you to:
- Enter an email address if there is not already one in the customer details, or change the address
- Send a blind carbon copy (e.g. to your self as proof of sending)
- Customize the subject line and message that will be sent with the invoice attached
- If you wish to attach other documents in addition to the invoice that is attached automatically:
- Click Choose Files and select the document(s) from your computer
- Notes:
- For customers who usually receive invoices by email because their Options tab has the Email option ticked in Invoice Options, Generate Invoices automatically emails each invoice as it is created
- When an overdue invoice is emailed, the amount overdue for the current invoice is printed in red on the top right of the invoice
- The Send Email window is displayed; this enables you to:
- Add Receipt: Only available if the invoice has an amount outstanding
- The receipt will be automatically allocated to this invoice
- See Receipts for other options for adding receipts
- Write Off Invoice: Only available if the invoice has an amount outstanding; see Writing Off Bad Debts below for details
- Cancel: If you need to fix an error in an invoiced order, you will need to cancel the invoice first
- If the invoice has been posted to your accounting package, you will need to Unpost it to enable the Cancel option
- If the invoice has been paid, the receipt will be unallocated when the invoice is cancelled
- After cancelling the invoice, click on the order that needs updating and Undeliver it to enable editing
- After updating the order, a new invoice will need to be generated and the receipt allocated to the new invoice
- After updating the order, a new invoice will need to be generated and the receipt allocated to the new invoice
- Invoice Details: The invoice details screen displays information on the invoice itself, plus a list of orders invoiced, and a list of receipts (if any) allocated to this invoice.
- Invoice Number: Automatically generated by EasyVend
- Invoice Date
- Status:
- Unpaid - invoice still has an amount outstanding
- Debit Failed - the automatic bank account/credit card debit via the payment gateway for this invoice has failed
- See the Payment Gateway section in Receipts for information on setting up automatic payment of invoices on the due date
- Pending - the automatic bank account debit via the payment gateway for this invoice has not yet cleared
- See the Payment Gateway section in Receipts for information on setting up automatic payment of invoices on the due date
- Paid - fully paid
- Cancelled - the invoice was created but has been cancelled
- Customer
- Click on the customer name to display the customer details screen in a new browser tab
- Period: How often the customer is invoiced, as set in the customer's Billing information
- Amount: The total amount of this invoice
- Created On: Displays the date and time this invoice was created
- Due Date: The due date of this invoice, as determined by the Credit Term set in the customer's Billing information
- Emailed On: The date the invoice was emailed, if any
- Printed On: The date the invoice was printed, if any
- Order list: Displays the order(s) invoiced by this invoice
- Click on a number in the Order # column to display that order in a new browser tab
- Receipt list: Displays the receipts allocated as payments for this invoice (if any)
- Click on a number in the Receipt # column to display that receipt in a new browser tab
Writing Off Bad Debts
EasyVend allows you to write off unpaid debts by creating a "Write Off Invoice" for unpaid or partially paid invoices.
- Select the unpaid invoice to be written off to display the Invoice Details screen
- Click Write Off Invoice
- In the Write Off Invoice window, enter the details:
- Amount: The amount that is unpaid on the invoice and that you are writing off
- Description: A description to identify this as a write-off; for easier cross-referencing, include the invoice being wholly or partially written off e.g. "Write-off Inv 156"
- Click Save
When you save the write-off, EasyVend:
- Creates a negative Invoice for the amount being written off
- For example, if you write off $90, an invoice for -$90 is created
- The new, negative invoice has an invoice number starting with 'W' and contains the Description you entered in the Write Off Invoice window
- Creates a $0 Receipt and allocates it to both the invoice being written off, and to the new write off invoice
- This allocation effectively pays both invoices by offsetting the original invoice against the write of invoice
- In the example of $90 being written off:
- $90 is allocated to the original invoice, AND
- -$90 is allocated to the new, negative invoice
Credit Notes
In EasyVend, a 'Credit Note' is any invoice where the total value of all orders on the invoice results in a negative invoice total. This can happen when the invoice contains returned or unavailable products added to the customer order(s) with a negative Quantity.
In the My Orders screen, you can:
- Add the same product to an order multiple times
- For example, the original order may contain a product with a positive quantity; if you have returns, you may add the same product again with a negative quantity
- Create multiple orders for the same customer on the same day
- For example, if you have returns or unavailable products, you may create a separate second order on a day to record those returns
Depending on the invoice period, an invoice may include multiple customer orders for the same day and/or multiple orders over a number of days. Therefore, creating a negative order does not necessarily create a negative invoice. A negative invoice (credit note) will occur when:
- You record returned or unavailable products by adding them to a customer order with a negative Quantity, AND
- The value of the returns is greater than the value of the other products included on the same invoice (if any).
Unless you actually refund the customer and enter a negative receipt in EasyVend, you will 'pay' a Credit Note (negative invoice) in EasyVend by offsetting it against one or more of the customer's outstanding invoices.
Refunding the Customer
If you have created a credit note and have actually paid the amount of credit to the customer as a refund, the refund can be entered as a negative receipt and allocated to the credit note:
- Select Customers from the Customers menu and display the customer's details screen
- Select the customer's Receipts tab
- Click Add New to open the New Receipt window
- Enter a receipt with a negative amount equal to the amount you are refunding
- Click Submit
- If the customer has Auto Allocate Receipt ticked in the Options tab of Customer Details, a negative receipt is automatically allocated against negative invoices
- If the customer has more than one negative invoice, you will need to check the negative receipt has been allocated correctly:
- Click the icon on the left of the new negative receipt
- Select Manual Allocate from the menu
- If the negative receipt has not been allocated to the correct credit note:
- Zero the incorrect allocation, and
- Enter the negative amount against the correct credit note
- Click the
- If the customer has more than one negative invoice, you will need to check the negative receipt has been allocated correctly:
- If Auto Allocate Receipt is not ticked for this customer, the Manual Allocations window will open automatically
- Allocate the negative receipt against the credit note (negative invoice)
Note: If you have not created a credit note and are refunding a customer because they have simply overpaid, see the Refunds section in Receipts for instructions on adding and allocating a refund for an overpayment.
Offsetting a Credit Note against an Outstanding Invoice
Instead of actually refunding the amount of a credit note to the customer, you can apply the credit to another outstanding invoice, reducing the amount owing on that invoice.
To offset a credit note (negative invoice) against the customer's outstanding invoices, create a receipt for $0 and allocate it to both the outstanding credit note and one or more outstanding invoices:
- Select Customers from the Customers menu and display the customer's details screen
- Select the customer's Receipts tab
- Click Add New to open the New Receipt window
- Enter a receipt for $0 and click Submit
- If the customer has Auto Allocate Receipt ticked in the Options tab of Customer Details, you will need to open the Manual Allocations window:
- Click the icon on the left of the new $0 receipt
- Select Manual Allocate from the menu
- Click the
- If Auto Allocate Receipt is not ticked for this customer, the Manual Allocations window will open automatically
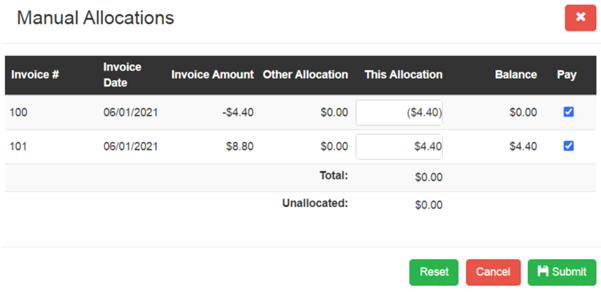
- In the Manual Allocations window:
- Tick the Pay checkbox for the Credit Note to fully 'pay' it with a negative allocation
- Tick the Pay checkbox for the outstanding invoice(s) against which you wish to offset the Credit Note to create matching positive allocations(s)
- For example, if the credit note is for -$4.40, you would allocate -$4.40 to the credit note to fully 'pay' it, and +$4.40 to outstanding invoice(s).
- Both the Total and the Unallocated amounts should be $0 as shown below
- Click Submit
Credit Notes and Automatic Debits via the Payment Gateway
If you create a Credit Note for a customer who is automatically debited for invoices via the payment gateway, the credit note will NOT be automatically credited to their credit/debit card. To ensure the customer does not remain in credit, once the credit note has been generated:
- Generate the next invoice for the customer
- Follow the steps above for creating a $0 receipt and using it to offset the credit note against the outstanding invoice
- When the next automatic debit occurs, the customer will be debited for only the remaining amount outstanding on the invoice
If you invoice daily and the customer is automatically debited the next day, you will need to offset the credit note as soon as you create the next invoice.