The Receipts option in the Customer menu is the main screen for viewing and adding receipts from trade customers.
When this option is chosen, a list of receipts from all sources is displayed. You can search and sort this list, select a receipt to view its details, or add a new receipt.
Apart from manually adding receipts via this screen, you can also go to a customer's details screen and add receipts via the Invoices or Receipts tabs. If you have a Merchant Account approved and activated by the JealTech staff, receipts may also be added via the payment gateway, rather than adding them manually.
Overview of Receipts in EasyVend
The receipt options available to you depend on whether you have a Merchant Account. If you have a merchant account, some or all receipts may be created by debiting the customer's debit/credit card or bank account via the payment gateway, rather than adding them manually.
The Payment Gateway
If you have an EasyVend Merchant Account, receipts via the payment gateway can be created in several ways:
- Automatically debiting the customer on an invoice's due date:
- To configure Customers for automatic debits, in the customer's Details screen:
- In the Billing Information section, set the Credit Term in days
- This is the number of days after the invoice date and will determine each invoice's due date
- If the Credit Term is 0, the due date is the invoice date
- In the Payment Options tab:
- Enter the customer's debit/credit card or bank account details
- For Enable Auto Debit When Invoice is Due, select Auto Debt Credit Card or Auto Debit Bank Account
- In the Billing Information section, set the Credit Term in days
- On an invoice's due date, the customer's card or bank account will be debited, and a receipt will be created in EasyVend and emailed to the customer
- Created By for the receipt will be System
- If the invoice has not yet been generated when automatic debits for the due date are processed, the automatic debit will occur during the next debit cycle after the invoice is generated. This is most likely to happen if the Credit Term is 0, and the invoice is not generated until on or after the invoice date.
- To configure Customers for automatic debits, in the customer's Details screen:
- Manually debiting a customer'd debit/credit card or bank account from the customer's Details screen:
- This method allows you to select multiple outstanding invoices for which the customer will be debited
- If the customer has debit/credit card and/or bank account details entered in the Payment Options tab, but is not set up for automatic debits:
- Go to the Invoices tab in the customer details screen
- Select the invoice(s) to be paid by ticking the check box to the left of the invoice(s)
- The Charge Credit Card and/or Charge Bank Account buttons will be enabled, depending on the details entered in the Payment Options tab
- The buttons will display the total amount to be debited, based on the invoices you have selected
- Click a Charge button to debit the customer
- For bank account debits, the payment will show as Pending until the bank has fully transferred the funds
- A Receipt will created and automatically allocated to the selected invoice(s)
- The receipt will be automatically emailed to the customer
- If a card surcharge is added to the amount payable, an invoice for the additional surcharge is also created and attached to the email to the customer
- Created By for the receipt will be the name of the EasyVend user who created the receipt
- Manually debiting a customer's debit/credit card or bank account for an invoice in the Invoices screen:
- If the customer has debit/credit card and/or bank account details entered in the Payment Options tab, but is not set up for automatic debits:
- Select Invoices from the Customers menu or click the Print Invoices button in the Dashboard to display the invoice list
- Select the invoice to be paid from the list
- In the Invoice Details screen, the Charge Credit Card and/or Charge Bank Account buttons will be enabled, depending on the details entered in the customer's Payment Options tab
- Click a Charge button to debit the customer
- For bank account debits, the payment will show as Pending until the bank has fully transferred the funds
- A Receipt will created and automatically allocated to the selected invoice
- The receipt will be automatically emailed to the customer
- If a card surcharge is added to the amount payable, an invoice for the additional surcharge is also created and attached to the email to the customer
- Created By for the receipt will be the name of the EasyVend user who created the receipt
- If the customer has debit/credit card and/or bank account details entered in the Payment Options tab, but is not set up for automatic debits:
- Customer making payments via your online website order portal:
- Customers who use the online order portal and do not have Auto Debt Credit Card or Auto Debit Bank Account enabled can pay outstanding orders or invoices via their credit card
- In the order portal, the customer will:
- Click on the folder icon to view an Order or an Invoice
- Unpaid Orders and Invoices have a Pay Now button enabled
- Click Pay Now
- The customer can then choose whether to pay using their existing card, or enter details of a different card
- Click Submit
- The customer's card will be debited
- If the customer is paying for an Order that has not yet been invoiced, an invoice for the order will be created in EasyVend
- The 'paid' invoice, including the card surcharge if applicable, will be emailed to the customer
- A receipt will be created in EasyVend and automatically allocated to the invoice being paid
- Created By for the receipt will be the name of the customer who made the payment
- Click on the folder icon to view an Order or an Invoice
- Forcing online order portal customers who have exceeded their Credit Limit to pay for a new order before it can be submitted:
- To configure Customers to prevent them from exceeding their credit limit, in the customer's Details screen:
- In the Billing Information section, set the Credit Limit in dollars
- When an online customer who has already exceeded their credit limit places a new order and goes to the checkout:
- A message is displayed "You need to pay this order to be able to submit"
- The payment screen is displayed, allowing them to keep using their current card or to enter details of a new card
- When the customer clicks Submit:
- The new order is submitted and an invoice for it is created
- Their debit/credit card is debited for the amount of the new order
- A receipt is created in EasyVend and allocated to the new invoice
- The 'paid' invoice is emailed to the customer
- Created By for the receipt will be the name of the customer who made the payment
- To configure Customers to prevent them from exceeding their credit limit, in the customer's Details screen:
Note: Once the payment gateway is enabled, the Receipts Reports option in the Reports menu will enable you to print a Declined Transaction Report. This report lists invoices for which payment via the payment gateway was declined in the selected date range.
Manual Receipts
For payments made by customers via cash, cheque, BPay etc (that is, any payments not made via the payment gateway), a manual receipt is entered when a payment is received. You can add manual receipts in several ways:
- Selecting Receipts from the Customers menu or clicking the Receipts button in the Dashboard to display the receipts list
- This option allows you to add a receipt for any customer; the receipt may be allocated to one or more of the customer's outstanding invoices
- From the receipts list, click Create New to open the New Receipt tab
- When you save the new receipt:
- If the customer has Auto Allocate Receipt ticked in the Options tab of Customer Details, the receipt will be automatically allocated to the oldest outstanding invoices
- If Auto Allocate Receipt is not ticked for this customer, the Manual Allocations window will open (see Manual Receipt Allocation below)
- Displaying the Customer Details screen and selecting the Receipts tab
- In the customer details Receipts tab, click Add New to open the New Receipt window and add a receipt for the current customer
- When you save the new receipt:
- If the customer has Auto Allocate Receipt ticked in the Options tab of Customer Details, the receipt will be automatically allocated to the oldest outstanding invoices
- If Auto Allocate Receipt is not ticked for this customer, the Manual Allocations window will open (see Manual Receipt Allocation below)
- Displaying the Customer Details screen and selecting the Invoices tab
- In the customer details Invoices tab, select the invoice(s) to be paid
- Click Paid to create a receipt that is automatically allocated to the selected invoice(s)
- Selecting Invoices from the Customers menu or clicking the Print Invoices button on the Dashboard to display the invoices list
- In the invoices list, select the invoice that is now being paid to open the invoice details tab
- Click Add Receipt to add a receipt that is automatically allocated to that invoice
Writing Off Debts
EasyVend allows you to write off unpaid debts by creating a "Write Off Invoice" for unpaid or partially paid invoices.
- Select the unpaid invoice to be written off to display the Invoice Details screen
- Click Write Off Invoice
- In the Write Off Invoice window, enter the details:
- Amount: The amount that is unpaid on the invoice and that you are writing off
- Description: A description to identify this as a write-off; for easier cross-referencing, include the invoice being wholly or partially written off e.g. "Write-off Inv 156"
- Click Save
When you save the write-off, EasyVend:
- Creates a negative Invoice for the amount being written off
- For example, if you write off $90, an invoice for -$90 is created
- The new, negative invoice has an invoice number starting with 'W' and contains the Description you entered in the Write Off Invoice window
- Creates a $0 Receipt and allocates it to both the invoice being written off, and to the new write off invoice
- This allocation effectively pays both invoices by offsetting the original invoice against the write of invoice
- In the example of $90 being written off:
- $90 is allocated to the original invoice, AND
- -$90 is allocated to the new, negative invoice
Offsetting Credit Notes against Invoices
If you have returns from a customer or a product on their order is unavailable, you can record this by adding the product to an order and entering a negative Quantity and a Return Reason.
When you generate an invoice, if the value of the returns is greater than the value of other deliveries included on the invoice (if any), the invoice total will be negative.
You can 'pay' a negative invoice (credit note) by offsetting it against one or more of the customer's outstanding invoices.
To offset a credit note against an invoice, create a receipt for $0 and manually allocate it to both the credit note and the invoice. For example, if the credit note is for -$5.00, you would allocate -$5.00 to the credit note to fully 'pay' it, and +$5.00 to outstanding invoice(s).
For full details on credit notes and how to offset them, see Credit Notes.
If you create a Credit Note for a customer who is automatically debited for invoices via the payment gateway, the credit note will NOT be automatically credited to their credit/debit card. To ensure the customer does not remain in credit, once the credit note has been generated:
- Generate the next invoice for the customer
- Create a $0 receipt and use it to offset the credit note against the outstanding invoice
- When the next automatic debit occurs, the customer will be debited for only the remaining amount outstanding on the invoice
If you invoice daily and the customer is automatically debited the next day, you will need to offset the credit note as soon as possible after you create the next invoice, and before the automatic debit occurs on the invoice due date.
The Receipts List - Searching and Sorting
When you select Receipts from the Customers menu, a list of existing receipts is displayed.
The Created By column in the receipts list indicates who created the receipt:
- Created by adding a receipt in EasyVend: Current vendor/user login name
- Created by the customer adding a receipt via online ordering, or by clicking the Pay Now link in an invoice notification email: Current customer login name
- Automatic direct debit: System
Searching
- To filter the receipt list, enter any combination of the search terms:
- Receipt Number: Enter a specific receipt number to find that receipt
- Date Range: Select From and To dates to show all receipts with a receipt date in that range
- Status: Select from the drop-down list to show only receipts with a specific status
- Any Status
- Active - all receipts except deleted receipts
- Pending - bank account debits via the payment gateway that have not yet cleared
- Unallocated - receipts that have not yet been fully allocated against invoices
- Allocated - receipts that have been fully allocated against invoices
- Deleted - receipts that were added and then deleted
- Customer Range: Select From and To customer codes to show receipts for customers in that range
- Groups: Select one or more Groups from the drop-down list
- To remove a Group from the search criteria, click the x to the right of the Group name
- Rounds: Select one or more Rounds from the drop-down list
- To remove a Round from the search criteria, click the x to the right of the Round name
- Payment Method: Select from the drop-down list to show only customers with that payment method
- Any Payment Method
- Cash - manual receipt
- Cheque - manual receipt
- Electronic - manual receipt
- Debit Credit Card - customer's credit card debited via the payment gateway
- Debit Bank Account - customer's bank account debited via the payment gateway
- Other - manual receipt
- Click Search to list receipts that match all your search criteria
- Use the navigation controls at the bottom of the list to set the number of items displayed per page, and to move between pages.
- To select a receipt and display its details, click anywhere on the receipt in the list
Sorting
- Click on a column heading to sort the receipts by that column
- Click the heading again to sort in reverse order
Adding and Allocating a Manual Receipt
To add a new receipt, click Create New in the Receipts list. The New Receipt tab is displayed. Enter the details for this receipt:
- Select Customer: Select the customer from whom you received the payment:
- Click this option to display the customer search window
- Enter a Customer Code, partial Customer Name, or Invoice Number
- Click Search to display a list of matching customers
- Click Select to the right of the customer making the payment
- Notes:
- Only vendor (trade) customers are included in the list
- Inactive customers can be hidden from the list by ticking the Hide inactive customers when creating new order, new receipt option in the General Settings section of General Settings
- Once a customer is selected:
- You can click on the Customer Code/Name to open the customer's details in a new tab
- The customer's current balance outstanding, including any unallocated receipts, is displayed.
- If the customer has unallocated receipts, you may wish to go to the customer's details screen and allocate any previous unallocated receipts before returning and continuing to add the current receipt
- The receipt Amount is automatically filled with the customer's current Unpaid Invoice Balance
- Click this option to display the customer search window
- Receipt Date: Select the date of the receipt
- Reference: Optionally type in a Receipt Reference; this could be an invoice or purchase order number
- Maximum length: 50 characters
- Payment Method: Select a payment method from the drop-down list
- Amount: Automatically filled with the customer's current Unpaid Invoice Balance
- If the customer has paid a different amount, type in the actual amount paid by the customer
- Bank Account: Your bank account where the payment was deposited
- If you have more than one bank account set up in General Settings, select the account from the drop-down list
- Bank, Branch and Drawer: Optional; the customer's bank details
- Populated automatically if these details have been added in Receipt Information in the customer details Options tab
- This information is included when printing a Bank Deposit Slip for cheques
- The maximum length for each field is:
- Bank: 30 characters
- Branch: 30 characters
- Drawer: 40 characters
- Click Save to save the new receipt
Automatic Receipt Allocation
- If the customer has Auto Allocate Receipt ticked, the receipt will be automatically allocated to the oldest outstanding invoices (if any)
- To set up automatic receipt allocation:
- Select Customers from the Customers menu
- Select the customer to be updated
- In the Customer Details screen, select the Options tab
- Tick Auto Allocate Receipt in Receipt Information
- Click Save Changes
- If you click Manually Allocate, or if you save a receipt and Auto Allocate Receipt is not ticked for the customer, the Manual Allocations window will open, showing a list of unpaid invoices
- To allocate the receipt amount against outstanding invoices:
- Type the amount to be allocated in This Allocation, or tick the Pay checkbox to fully pay the invoice (or pay as much as possible using the balance unallocated for this receipt)
- At the bottom of the list you can see the total allocated so far, and the amount still unallocated
- Click Submit to complete the allocation
- Notes:
- If the customer has overpaid, or you don't know what the payment is for, you can leave all or part of the receipt unallocated
- You cannot over-allocate an invoice
- For a $100 invoice, the total amount allocated to it must be between $0 and $100
- For a -$100 invoice, the total amount allocated to it must be between $0 and -$100
- You can allocate positive or negative amounts for a receipt
- You don’t have to fully allocate a receipt, but you cannot over allocate a receipt
- For a $200 receipt, the total allocation must be between $0 and $200
- For a -$200 receipt, the total allocation must be between $0 and -$200
- If the receipt you are allocating has been deleted in the meantime (for example, by another user on a different computer), you will receive the message "Invalid Receipt or Receipt Deleted" and the allocation will not be processed
- If Auto Allocate Receipt is NOT ticked in the Options tab of Customer Details, unallocated amounts should be allocated to the appropriate invoice when the customer's next invoice has been created, or when you find out what the payment was for
Handling Overpayments as Customer Credit
- When a customer pays more than the amount outstanding on their invoice, the additional amount can be recorded in EasyVend and made available as a credit for future invoices. The steps below outline the correct procedure when the overpayment appears in your bank feed and you are synchronising EasyVend with Xero.
- This section applies when the overpaid amount will be kept as a customer credit and applied to a future invoice. If you are refunding the overpaid amount back to the customer, see Refunding an Overpayment.
Processing an Overpayment
To record an overpayment and ensure the credit is available in both EasyVend and Xero:
- Create the Receipt: Enter a receipt for the full amount deposited into your bank account.
- Allocate the Receipt: Allocate the receipt against the customer's unpaid invoice(s) as required.If the receipt amount is greater than the balance owing:
- Only the allocated portion will be applied
- The remaining amount will stay Unallocated
Unallocated receipt amounts remain visible in the customer’s Receipts tab and represent a credit available to apply to future invoices.
Sync to Xero
When you synchronise EasyVend with Xero, the receipt (including the unallocated portion) is transferred to Xero.
Match the Bank Transaction in Xero
- In Xero:
- Go to Bank Reconciliation > Find & Match
- Select the receipt, not the invoice
- Match the bank deposit to the full receipt amount
This ensures the transaction is reconciled correctly. The unallocated portion will be recorded in Xero as an Overpayment for the customer.
Credit Availability
After matching:
- In EasyVend, the credit remains as an unallocated amount on the receipt
- In Xero, the credit appears as a customer overpayment and can be applied to the next invoice
Applying the payment to the invoice in Xero instead of the receipt may cause allocations between EasyVend and Xero to become out of sync. Credits will remain available until applied to a future invoice in either system.
The Receipt Details Tab
When you select a receipt from the Receipt List, the Receipt Details tab allows you to view the details for that receipt, including the invoice(s) it has been allocated against, if any. Manual receipts can be edited or deleted if they have not yet been posted to Xero or MYOB. In addition, from the details screen you can:
- Previous and Next: Use these options to move move back and forward through receipts in the list and view their details
- Create New: Click to add a new manual receipt
The Current Receipt
- Print: Print a copy of the receipt
- The receipt will show the amount allocated to each invoice, along with the order numbers for each invoice
- Auto Allocate: Automatically allocate the receipt against the customer's oldest outstanding invoices; only available for manual receipts
- Note: If the customer has Auto Allocate Receipt ticked in the Options tab of Customer Details:
- A new manual receipt will be automatically allocated to the oldest outstanding invoices
- Generating a new invoice will also cause any unallocated receipts from the customer to be allocated automatically
- Note: If the customer has Auto Allocate Receipt ticked in the Options tab of Customer Details:
- Manually Allocate: Open the manual allocation window to change the invoices this receipt is allocated against
- Save: Save changes made to the receipt details; only available for manual receipts
- Delete: Delete the receipt; only available for manual receipts
- If the manual receipt has been posted to Xero or MYOB, you must Unpost it before it can be edited or deleted
- If the manual receipt has been posted to Xero or MYOB, you must Unpost it before it can be edited or deleted
- Receipt Details: In addition to the information entered when creating a manual receipt, the receipt details screen displays other details such as the Status of the receipt, and any amount not yet allocated:
- Receipt Number: Automatically generated by EasyVend
- Receipt Date
- Reference
- Status:
- Pending - bank account debit via the payment gateway that has not yet cleared
- Unallocated - receipt that has not yet been fully allocated against invoices
- Allocated - receipt that has been fully allocated against invoices
- Deleted - receipt that has been deleted
- Customer
- Click on the customer name to display the customer details screen in a new browser tab
- Payment Method:
- Manual receipts: Cash/Cheque/Electronic/Other
- Online payments via the payment gateway:
- Debit Credit Card - customer's credit card debited
- Debit Bank Account - customer's bank account debited
- Amount
- Bank Account: Your bank account to which the payment was made
- Unallocated: Amount of the receipt not yet allocated against an invoice
- Bank, Branch and Drawer: The customer's bank details, if any
- Created On: Displays the date and time this receipt was created
- Updated On: Displays the date and time this receipt was last changed
- Invoice list: Displays details of the invoice(s) this receipt has been allocated to, if any
- Click on a number in the Invoice # column to display that invoice in a new browser tab
Refunding an Overpayment
If a customer overpays you and you actually refund the money to the customer (rather than allocating the excess money to the next outstanding invoice), you can enter the refunded amount as a negative receipt and allocate it to the overpaid invoice. For example:
- Invoice to customer: $647.40
- Receipt from customer: $650.00
- Refund to customer: $2.60
- When the receipt for $650 is received:
- Add the receipt for $650 as usual:
- Click Add New in the customer's Receipts tab, or
- Click Create New in the Receipts List
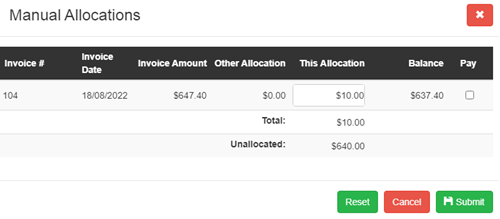
- Only partially allocate the receipt to the invoice
- Use Manually Allocate to allocate at least the amount by which you were overpaid, but less than the invoice amount
- In this example, I have allocated $10 to the invoice because it is a nice round amount to type in:
- Add the receipt for $650 as usual:
- To refund the $2.60 overpaid:
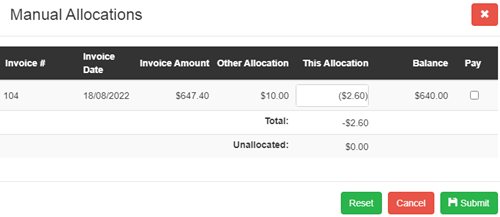
- Add the receipt for -$2.60
- Manually allocate the full -$2.60 to the partially paid invoice
- The invoice will now have $640 outstanding
- The invoice will now have $640 outstanding
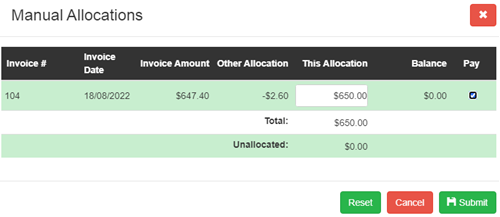
- Return to the $650 receipt and fully allocate it to the outstanding invoice
- Select the receipt for $650
- Select Manually Allocate
- Tick Pay to change the allocation amount from $10 to $650 to fully allocate the receipt to the invoice that was overpaid