See also Overview of Entering Orders in EasyVend for a summary of the various ways in which customer orders can be entered in EasyVend.
The My Orders option in the Orders menu is the main order entry screen.
Overview
Initially, a list of existing orders for the Working Date is displayed. From this list screen you can:
- Change the sort order of the list by clicking on a column header
- Use the search function to find a specific order, or to limit the list to show orders that match specific criteria (for example, to list only orders for a particular round)
- Find customers who have more than one order for a single day
- Create a new order
- Select an existing order from the list to display the order details
Once you have selected or created an order, the order details tab will enable you to:
- Update or cancel the order
- Mark the order as delivered
- Copy the order for use on another day
- Print a delivery docket
- Print an invoice for the current order
- If the order is delivered or invoiced, email a delivery docket to the customer (with additional files attached if required)
Notes
- Multiple Orders: You can create multiple orders for a customer on the same day. For example, if your main delivery to a customer is in the morning, but you also do a top-up afternoon delivery, you can use Create New to create a second order for the afternoon delivery.
- Multiple Instances of a Product: In the My Orders screen, you can add the same product to an order multiple times. For example, you may have a "buy 4, get 1 free" offer for a new product. You would enter the product with a quantity of 4 and the normal selling price, and then enter the product a second time with a quantity of 1 and a selling price of $0.
- When adding a product that is already in the order, the duplicate product will be highlighted in orange to warn you that there is already an entry for that product.
- See the FAQ below for more examples of when these features may be useful.
- Enforce online ordering of whole Order Crates/Boxes: For selected customers and products, when a customer places an online order via your website or the EasyVend Orders app, you can enforce the ordering and delivery of whole Order Crates/Boxes only.
- See Enforcing Whole Crates/Boxes for customer online orders below for details.
While still in the order details screen, you can also:
- Go to the next or previous order in your list
- Go to the next or previous customer, or search for a specific customer
- If an order does not already exist on the day for that customer, the New Order tab will display, enabling you to create a new order
Customers may have multiple orders on each day, so the Order Number is useful for distinguishing between orders for the same date and customer.
The My Orders List - Searching and Sorting
When you select My Orders from the Orders menu, you will see a list of existing orders for your Working Date. These orders may have been imported from Standard Orders, created or updated in EasyVend, or entered by the customer via your website portal.
The Working date is set when you first log into EasyVend, and can be changed by selecting Working Date from your user menu in the top right corner of the screen.
You can display the orders for a different day by clicking the Previous Day and Next Day buttons on the top right of the screen.
Searching
- To search for a specific order, enter an Order Number or Customer PO and then click Search
- To list only orders in the selected date range where a customer has more than one order on the same day, click Duplicated Orders
- If you have set other filters, they are ignored
- The list displays all orders in the date range where a customer has more than one order on a single day
- If you have an online order website, this option is particularly helpful in finding customers who have added a new online order instead of editing their existing order
- To return to your normal list of orders, set/remove filters as required and click Search
- To filter the orders list, enter any combination of the search terms:
- Customer Name: Filter for all customer names containing your search term
- Date Range: Select From and To dates to show all orders with a delivery date in that range
- Status: Select from the drop-down list to show only orders with a specific status
- Active - all orders except cancelled orders
- Ordered - order can still be edited
- Confirmed - The order has been confirmed by the vendor, or was previously marked as delivered and then changed back to undelivered. The order can still be edited.
- Billing Rollback - order was sent to Central Billing, but has been rolled back so it can be edited and re-sent to Central Billing; see Amending an Order already Sent to Central Billing below for more details
- Dispatched - this status may be set by your supplier
- Docket Printed - order can no longer be edited
- Delivered - an order can be marked as 'Delivered' in MiniVend or in EasyVend; if a docket has not yet been printed, this will prevent further editing
- Invoiced - order can no longer be edited
- Cancelled - order can no longer be edited
- Type: Select from the drop-down list to show only orders of a specific type
- Online - added via your website's Online Order Portal
- Standard - created using Import Standard Orders
- Manual - created in My Orders or via Quick Entry Orders
- EDI - created from EDI integration with your Supplier
- Foodstuffs - created through integration with Foodstuffs eXchange (NZ Only)
- Imported - imported from external services (if applicable for your supplier)
- Round: Select one or more Rounds from the drop-down list
- To remove a Round from the search criteria, click the x to the right of the Round name
- Group: Select one or more Groups from the drop-down list
- To remove a Group from the search criteria, click the x to the right of the Group name
- Customer: Select a specific customer by typing a Customer Code or a partial Customer Name, and then selecting from the drop-down list of customers
- New Online Orders Only: Show orders where they are the first order for a new Customer that was created either by an Auto-Approved Online Registration, or by going through the E-Commerce Website Checkout without an account (Only applies where 'Registration and Checkout Option' is set to Level 2 or 3)
- Not-Confirmed Order Only: Tick this option to display only customer orders that are waiting to be confirmed by the vendor.
- This filter is used when Delivery Date Not Required for Customer Orders is enabled in General Settings, Website Settings.
- Click Search to display the orders awaiting confirmation.
- An asterisk beside the Delivery Date identifies an order that has not yet been confirmed.
- Click Search to list orders that match all your search criteria
- Use the navigation controls at the bottom of the list to set the number of items displayed per page, and to move between pages.
- To select an order to display its details, click anywhere on the order in the list
Sorting
- Click on a column heading to sort the orders by that column
- Click the heading again to sort in reverse order
Adding a New Order
To add a new order, click Create New in the My Orders list. The New Order tab is displayed. Enter the details for this order:
- Delivery Date: Select the date the order is to be delivered
- If the Delivery Date is different from your Working Date, the date and day will be highlighted in orange
- This highlighting is an advisory only to warn you the order on screen is not for your working date
- If the Delivery Date is different from your Working Date, the date and day will be highlighted in orange
- Customer Name: Select the customer from the drop-down box.
- You can quickly find the customer by typing in their Customer Code or a partial Customer Name
- Inactive customers can be hidden from the list by ticking the Hide inactive customers when creating new order, new receipt option in the General Settings section of General Settings
- Customer PO: Optionally type in a Purchase Order or Reference number for the order
- A Default Purchase Order Reference for each customer can be set in the customer's Standard Order tab
- If a default value is set, it will be used when orders are created via:
- My Orders
- Quick Entry Orders
- Import Standard Orders
- Weekly Order Edit
- The online Customer Order Portal
- Round: Select the delivery Round for this order.
- This will initially be populated with the Round specified in the customer's Round setting for the delivery day, or, if no Round is specified there, with the customer's Default Round.
- In the customer detail screen, you select a Round as the default for that customer.
- If the customer is in different rounds on different days, you can set a different Round for each delivery day by selecting the appropriate Round in the Round section of the customer's Options tab.
- You can select a different round if needed. This is useful if you have morning and afternoon rounds, and you create a second, afternoon order for the customer.
- This will initially be populated with the Round specified in the customer's Round setting for the delivery day, or, if no Round is specified there, with the customer's Default Round.
- Add the products being ordered:
Standard Orders
If this is the selected customer's first order for that delivery date, and if they have a Standard Order, the list of products will be automatically populated with the customer's Standard Order. You can edit the standard order and add or delete products as required.
If you change the delivery date while still creating the new order, the product list will be re-populated with the Standard Order for the new delivery day.
Load Standard Orders
- If the customer does not usually receive an order on the selected day, the Standard Order is not loaded into the new order
- When creating a new order , the Load Standard Orders button is available once a date and customer have been selected.
- Click this button will load the list of products in the customer's Standard Order, even if they do not usually receive a delivery on that day
- Note:
- As the customer does not usually have a delivery on this day, no quantities are imported
- The Standard Order products will replace any products and quantities you have already entered
- Edit the order as required and then click Save Changes
- If Enable order item - description editable in order form in General Settings is NOT ticked (the default):
- Product Code: If you know the product code of the product, type it here; otherwise, press <Tab> or <Enter> to move to description
- When adding a product that is already in the order, the duplicate product will be highlighted in orange to warn you that there is already an entry for that product.
- Duplicate products are allowed in the My Orders screen and are useful when you have 'specials' or returns.
- If you add a product that has been marked as Out of Stock, the quantity field will be highlighted and an 'Out of Stock' warning message will be displayed
- Description: Select the product from the drop-down list
- Click in the column or press <Space> to type in a partial product code or partial product name to quickly filter the list
- In General Settings, the General Settings tab allows you to specify whether the you want to search by the EasyVend (Vendor) Product Code or by the Supplier Product Code
- Use <Up> and <Down> to move about the list
- Press <Enter> to select the highlighted product
- Click in the column or press <Space> to type in a partial product code or partial product name to quickly filter the list
- Product Code: If you know the product code of the product, type it here; otherwise, press <Tab> or <Enter> to move to description
- If Enable order item - description editable in order form in General Settings IS ticked:
- The drop-down list for selecting a product is moved to the Product Code column rather than the Description column
- You can still search for products in the drop-down list by entering a partial product code or partial description
- Once a product is selected, the default description will be displayed
- The Description of the product for the current order can be edited
- Note: This option allows you to annotate the product for the current order entry only (for example, to note that it is a substitute product). It should NOT be used to change to an entirely different product, as the product code is still used to determine things such as stock levels, cost price and whether GST applies to the product.
- If the description of a product is updated, products with an updated description are listed separately from the original product on:
- Delivery Dockets
- Invoices, and
- The following Run Reports:
- Daily Load Summary Report
- Run Sheet For Delivery Report
- Weekly Run Sheet Report
- Other reports continue to be based on the product code; products with a modified description will be included under the original product code/description
- The drop-down list for selecting a product is moved to the Product Code column rather than the Description column
 : This icon indicates ordering of whole Order Crates/Boxes will be enforced for this product when the customer places an online order via your online order website or the EasyVend Orders app.
- It is displayed if:
- The product being ordered has a quantity in the Order Crating/Box field, and
- The customer has a tick in the Order Whole Crate option
- Click to display the tooltip which includes the Order Crating/Box quantity for this product
- It is displayed if:
- Del Qty: Enter the quantity being Delivered
- For Returns, enter a negative quantity
- See Products Sold by Weight for more information on setting up and ordering products sold by weight (per 100gm, per kg etc)
- Items with a blank or zero quantity can be entered and marked as delivered, but they are not printed on delivery dockets and are removed from the order when it is invoiced
- If Enable Order Qty and Substitute in Order in General Settings IS ticked:
- These columns will only appear if there are already values in the columns, or if the user clicks the expand button in the top-right corner of the Order's Product List
- Ord Qty: The quantity being Ordered:
- If the Order was placed Online or through the Order App, this column will be populated with the Quantities the Customer Ordered (the Del Qty will also be populated with the same values when the Order is placed)
- If the Order is entered by the Vendor (either manually or through Importing Standard Orders), this quantity will be left blank, and EasyVend will assume that the Ord Qty is the same as the Del Qty
- If the values for Del Qty and Ord Qty are different, and Ord Qty is not empty, then this will be represented on the Docket. If the values are the same, or Ord Qty is empty, and Ord Qty will not be shown for that Product on the Docket
- Substitute: Ticking this option will add an asterisk (*) to the end of the Product Description, and then include a legend below the Product List on the Docket to let the Customer know that is Product is a Substitute for another
- Return Reason: If you type in a negative quantity, you are required to select a Return Reason from the drop-down list
- Return Reasons can be added by selecting General Settings from the Settings menu, and clicking the Return Reason Codes tab
- Unit Price: The Unit Price, based on the customer's price level, is displayed
- The unit price includes GST and the CDS fee, if applicable
- If the product is in the customer's Standard Order and has an additional Adjustment there, the unit price displayed is the price after adjustment
- You can edit the Unit Price if required.
- Changes made here apply to this order only
- CR Qty: The number of containers returned with this delivery. If the field is left blank, the number of containers returned will be equal to the Del Qty.
- The field can only be edited for products that have a container set.
- This field will only appear if the Container Management feature is enabled. If you wish to enable this feature please contact the Jeal Tech team on 02 9188 4470 or at info@jealtech.com.au
- Tax Rate: The tax rate for this product is displayed
- Total: The total price for this product is displayed
- Add an Order Note if required
- Order Notes are for internal use only and are not printed on the delivery docket
- Add a Docket Note if required
- The Docket Note will be printed on the delivery docket for this order
- If want a message to be printed on all your dockets for this customer:
- Create a docket message:
- Select General Settings from the Settings menu
- Click on the Invoice & Docket Messages tab and add the message
- Assign the newly created docket message to the customer:
- Go to the customer's Options tab
- In the Docket Information section, select the message from the drop-down list for Docket Message
- Create a docket message:
- If the Order Fee is enabled in General Settings, click Add Order Fee to add the fee to the current order (Note: If the Order Fee is already added to the order, this will not add a new one)
- Check your order is correct
- If a product is entered in error, it can be deleted by pressing the x to the right of the product
- When you are happy with the order, click Save Changes.
Enforcing Whole Crates/Boxes for customer online orders
For selected customers and products, when the customer places on online order via your order website or the EasyVend Orders app, you can enforce the ordering of whole Order Crates/Boxes only.
To set up ordering of whole crates/boxes in customer orders:
- For each product that you want some or all customers to order in whole Order Crates/Boxes:
- Select the product in the My Products product list
- In the product's Order Crating/Box field, enter the quantity contained in the crates/boxes you deliver for this product
- Note: The quantity in an Order Crating/Box reflects the quantity in the crate or box you deliver to customers. It may be different from the Units per Crate you receive from your supplier.
- Click Save Changes
- For each customer who must order whole crates/boxes of the restricted products:
- Select the customer in the Customers list
- Click the customer's Options tab on the left
- Tick the Order Whole Crate option in the Options section
- Click Save Changes
For a customer who has Order Whole Crate selected, products with a quantity in Order Crating/Box will have a after the product name in the My Orders screen and in the customer's Standard Orders tab.
- The tooltip will display the message Customer online order quantity must always be a multiple of [x] where x is the quantity in Order Crating/Box for that product
If ordering of whole Order Crates/Boxes is set up:
- When the customer places an online order for that product, if a quantity is entered that is not a multiple of x, it will be automatically rounded up so the order is for whole Order Crates/Boxes
- When placing their order, the customer will see the icon next to products that must be ordered in whole crates/boxes. Tapping the icon will show the tooltip:
- Order can be placed in whole crates only. Any quantity entered will be rounded up to next whole crate. Order quantity should always be a multiple of [x].
- When placing their order, the customer will see the
- Ordering of whole crates/boxes is also enforced in the Customer Standard Orders screen in EasyVend, as the Standard Order can be used to create the default order the customer sees when ordering online
- Actual order quantities you enter via EasyVend or the MiniVend app are not affected by this setting, as you need to be able to enter the actual quantity delivered, including short/over deliveries, returns etc
The Order Details Tab
When you select an order from the My Orders list, or save a newly created order, the Order Details tab is displayed.
In the Order Details tab, you can carry out actions relating to the order currently on screen, navigate between orders, or create a new order.
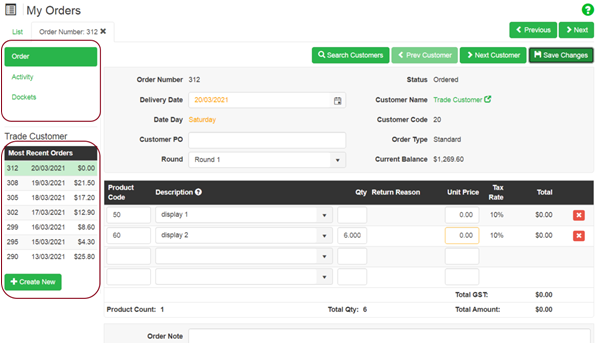
In addition to the current order details, this screen displays:
- On the left side of the screen:
- Options allowing you to switch between:
- A list of the Most Recent Orders, and
- A Create New button allowing you to add a new order for this customer
- On the top right, above the current order details:
- Buttons enabling you navigate between orders.
The Current Order Tab
The options available for the order currently on screen depend on the status of that order. For example, once a delivery docket has been printed, or the order has been invoiced or marked as Delivered, most items can no longer be edited.
Current Order Tab: Editing | Cancelling | Copying |Confirming an Order | Marking as Delivered | Printing a Docket | Emailing a Docket | Printing an Invoice | Emailing an Invoice | Amending an Order already Sent to Central Billing
- If the current order has a status of Ordered, Confirmed, or Dispatched, it can still be edited
- If the Order Fee is enabled in General Settings, click Add Order Fee to add the fee to the current order (Note: If the Order Fee is already added to the order, this will not add a new one)
- Unless the order has been cancelled, the Customer PO and Order Note fields can always be updated, even after the order has been invoiced
- To update the order, simply enter any changes required and then click Save Changes
- If the current order has a status of Ordered or Confirmed, it can still be cancelled
- When an order can be cancelled, the Cancel Order button is visible and enabled
- To cancel the order:
- Click Cancel Order
- Answer Yes when asked to confirm
- If you cancel an order in error, you can reinstate the order:
- Click Reinstate Order
- Answer Yes when asked to confirm
- You can copy any order (including a cancelled order) to create a new order:
- Click Copy Order
- The New Order tab opens, with a copy of the previous order
- Change the order details, such as the date and product details, as required
- Click Save Changes
- When Customer Delivery Date Not Required for Customer Orders is enabled in General Settings → Website Settings, online customer orders may require confirmation by the vendor.
- To find and confirm these orders:
1. Select My Orders from the Orders menu.
2. Tick Not-Confirmed Order Only.
3. Enter any other search criteria required.
4. Click Search.
5. Select the order from the list.
6. Review the delivery date, products, quantities and other order details.
7. Make any required changes.
8. Click Confirm Order.
The order is confirmed and will no longer appear when Not-Confirmed Order Only is selected.
- To find and confirm these orders:
- An order can be marked as 'Delivered' in either MiniVend or EasyVend
- A 'Delivered' order can no longer be updated unless it is 'Undelivered'
- To mark an order as 'Delivered':
- Click Deliver
- Answer Yes when asked to confirm
- Any unsaved changes will be saved when the order is marked as 'Delivered'
- If you 'deliver' an order in error, you can set it back to its previous status:
- Click Undelivered
- Answer Yes when asked to confirm
- To print (or reprint) a single docket for the order currently on screen:
- Click Print Docket
- If changes have been made to the order but not saved, the changes will be saved before printing the docket
- The docket is produced as a pdf which can be viewed and/or printed
- See Printing In EasyVend for details on handling pdf files
- Note: To batch print delivery dockets for a group of customers, select Print & View Dockets from the Orders menu
- The delivery docket for the order on screen can be emailed if:
- The order contains products and
- The order has been marked as 'Delivered' or has been invoiced
- To email the docket:
- Click Email Docket
- A new window displays with:
- To: The customer's email address from the Customer record (if present)
- Subject and Message: The default details as set in the Docket Notification email template in the Email Templates section of General Settings
- If required, edit the details displayed
- If you wish to attach other documents in addition to the delivery docket that is attached automatically:
- Click Choose Files and select the document(s) from your computer
- Click Send
- The customer will receive an email with the docket (and any other files you have selected) attached
- Notes:
- Depending on the customer's settings, dockets may also be emailed to the customer if you use MiniVend to Deliver or Sign & Deliver an order
- See the Docket Settings section in Print & View Dockets for an overview of docket settings
- For Trade customers, to print a single invoice for the order currently on screen:
- Click Create Invoice
- If changes have been made to the order but not saved, the changes will be saved before printing the invoice
- The invoice is produced as a pdf which can be viewed and/or printed
- See Printing In EasyVend for details on handling pdf files
- See Printing In EasyVend for details on handling pdf files
- The invoice is for the order currently on screen only
- If invoices are subsequently batch generated for this customer:
- Any orders for which you have already generated an invoice from the My Orders screen will NOT be re-invoiced
- Orders not yet individually invoiced will be invoiced as usual
- If the Customer is a Foodstuffs customer, but the order hasn't come from Foodstuffs eXchange, click the arrow on the button to get two options:
- Foodstuffs EDI Invoice - This will send the invoice directly to Foodstuffs eXchange
- Normal Invoice - Produce a standard EasyVend invoice and do not send directly to Foodstuffs eXchange
- Just clicking Create Invoice will send the invoice directly to Foodstuffs eXchange
- Note: To batch print invoices for a group of customers, select Invoices from the Customers menu
- Once an invoice has been created, the invoice number is displayed in the top section of the Order Details screen.
- To email an invoice to the customer from the Order Details screen:
- Click on the Invoice Number to open the Invoice Details screen
- Click Email
- A new window displays with:
- To: The customer's email address from the Customer record (if present)
- Subject and Message: The default details as set in the Invoice Notification email template in the Email Templates section of General Settings
- If required, edit the details displayed
- If you wish to attach other documents in addition to the invoice that is attached automatically:
- Click Choose Files and select the document(s) from your computer
- Click Send
- The customer will receive an email with the invoice (and any other files you have selected) attached
Amending an Order already Sent to Central Billing
- Once an order has been sent to Central Billing, it has a Status of Invoiced and can no longer be edited. However, if the order was rejected by the supplier, you can amend the order ready for re-sending to the supplier via Central Billing:
- Click Amend Order
- Notes:
- This button is only active if you are the Master user or have a User Role of Administrator
- The button is only available for Customer Orders that have been sent to Central Billing
- Notes:
- Answer Yes to confirm you understand the order should only be changed if it was rejected by the supplier
- You can now make changes to the Customer Order
- The order has been unlinked from the central billing file in which it was originally sent to the supplier
- The status of the order has been changed to Billing Rollback
- An Activity Type of Amend has been added to the order's Activity tab
- When the status is Billing Rollback, the delivery docket cannot be cancelled
- If you change the status of the order (for example, using Deliver and Undeliver), the option to cancel the delivery docket may become available. The delivery docket must not be cancelled - the Docket Number must remain the same when your resend the Customer Order to Central Billing.
- Make the required changes to the order
- Click Save Changes
- Once the Customer Order has been amended, it can be re-sent to Central Billing. Be sure to include the delivery date of the amended order when you next generate a Central Billing file. See Central Billing for more information.
- Click Amend Order
Activity Tab
Clicking on the Activity tab for the current order allows you to see activity such as the order being updated, cancelled or invoiced.
The activity recorded includes products being added or removed from the order, and quantities being changed. As well as changes made via the My Orders screen, the Activity tab records changes made via Quick Entry Orders, Substitute Customer Orders, and Weekly Order Edit.
Dockets Tab
The Dockets tab will list any dockets printed for the current order and show their status. To reprint a docket in the list:
- Click the
 icon to the left of the docket
 - Select Print from the drop-down
Most Recent Orders
On the left of the screen, the Most Recent Orders section gives you an instant overview of the current customer's seven most recent orders. This enables you easily see what days already have orders. From this list you can:
- Click on a recent order to display that order
- Click Create New to add a new order for the customer
Navigating between Orders
In addition to updating the current order, the Order Details tab allows you to navigate between orders:
Previous and Next
- Use these options to navigate through the list of existing orders as displayed in the List tab
Search Customers
- Search for a particular customer by entering a Customer Code or a full or partial Customer Name
- After typing a Customer Code or Customer Name:
- Pressing <Enter> will search for the customer
- Pressing <Enter> a second time will select the first name in the list
- You can also select the required customer from the search results by clicking the
 icon next to the customer
 - If the customer does not already have an order for the current date, a new order is created
- If the customer has a Standard Order, it will be imported automatically
- If you wish to create an order for that customer, enter the order details and click Save Changes
- If you do not wish to create a new order, simply continue searching
Prev Customer and Next Customer
- Use these options to navigate through customers in Customer Code sequence
- If you reach a customer who does not yet have an order for the current date, the New Order screen is displayed
- If you wish to create an order for the customer, enter the order details and click Save Changes
- If you have moved to a customer who has a Standard Order, but doesn't yet have an order created for the date, the Standard Order will have beeen imported automatically
- If you do not wish to create a new order, simply continue navigating through the customers
- If you wish to create an order for the customer, enter the order details and click Save Changes
Foodstuffs Orders
Orders that have come in through Foodstuffs eXchange have a few differences to regular Orders.
Foodstuffs Error
If there was an error when importing the Purchase Order, this checkbox will be checked. Refer to the Activity Tab to see what errors occurred during the Import.
Accepting an Order
When an Order comes in, it will populate all of the Products, Quantities and Prices from Foodstuffs eXchange.
If you are able to fulfill the Order, you can update any quantities as needed (you cannot increase the quantity above what was ordered, but you can reduce the quantity or remove Products as needed), then click on the Accept button to mark the Order as Confirmed in Foodstuffs eXchange.
Note: Once an Order has been Accepted, it can no longer be modified. Please ensure that all quantities are correct before accepting an Order.
Rejecting an Order
If you are unable to fulfill an Order, you can click on the Reject button. This will bring up the Reject Reason screen, allowing you to select why you are rejecting the Order, or allowing you to enter your own reason.
Invoicing an Order
Invoicing a Foodstuffs Order can be done from the Orders screen individually or through the Invoices screen in bulk. Once an Order is invoiced, the Invoice will be sent directly back to Foodstuffs eXchange.
Activity Tab
Additional Activity will be logged for Foodstuffs Orders, including any Import Errors, as well as sending Approvals, Rejections and Invoices.
Note: Unlike other Orders, Orders imported from Foodstuffs eXchange will not automatically update Prices when the Delivery Date is changed.
Frequently Asked Questions
What if I have printed a docket, but my actual delivery is different from the order?
The easiest option is to create a new customer order for the same date, and record the variations in the new order. For example, if the original order was for 12 Coffee Flavour, and you instead deliver 6 Chocolate and 6 Coffee, the new adjustment order would be for +6 Chocolate and -6 Coffee.
What if I have invoiced an order, buy my actual delivery is different from the order?
Again, the easiest option is to create a new customer order for the same date, and record the variations in the new order. There is no need to cancel the invoice. When EasyVend generates an invoice, it looks for any previously un-invoiced orders and includes them in the next invoice. For example:
- You have a daily invoiced customer with an order for 5th August
- You generate their invoice for 5th August, so their Next Invoice Date is now 6th August
- When the order is delivered, additional goods not in the invoiced order are also delivered
- Instead of cancelling and re-generating the invoice for the 5th, you can:
- Go to My Orders and add a second order for 5th August for the additional goods
- When you generate an invoice for 6th August, EasyVend will see the second order on the 5th has not yet been invoiced, and will include it on the invoice for the 6th
How do I enter special offers such as "buy one get one free" or "buy one get 50% off the second"?
In the My Orders screen, the same product can be added to an order multiple times:
- Add the full-price product to the order as usual, entering the quantity that is being charged the normal price.
- Then add the product for a second time, entering the quantity to be delivered at the discounted price, and change the unit price to the discounted price.
- When adding a product that is already in the order, the duplicate product will be highlighted in orange to warn you that there is already an entry for that product.
Note: You must be in the My Orders screen to enter the same product twice. Other methods of entering orders are designed to prevent you from accidentally adding multiple instances of a product:
- Quick Entry Orders:
- If you enter the same product twice in a Quick Entry session, you must remove any duplicates before the order can be saved
- If you use Quick Entry to add a product that is already in the customer's order for that day, the Quick Entry will overwrite the existing order quantity for that product, not add it a second time
- Import Standard Orders:
- When adding a Standard Order for a customer, you cannot add the same product twice. There will be a warning and the Standard Order can't be saved until the duplicate is removed
- Weekly Order Edit:
- Weekly Order Edit allows you to edit the current order line for a product, and to add a second order line for the same product.
- Entering the product on a second line may be useful for entering returns, but you cannot change the product price in the weekly order screen, so it is not useful when you are delivering some products at a discounted price