V1 Portal/Website: V1 Portal/WebsiteDownload PDF version for your customers
The EasyVend online orders portal and app allow you to place your orders via your vendor's website. Depending on the vendor's setup, you may also be able to securely make payments for invoices and orders.
EasyVend supports two types of online ordering website:
• Online Order Portal – Version 1: Customers can place orders through the website using a web browser. Existing users may also continue to use EasyVend Orders app, which is linked specifically to the Version 1 Online Order Portal.
The EasyVend Orders app is still operational; however, no further updates or improvements are being made to it. For this reason, customers should be directed to use the website through their browser rather than relying on the app.
• E-Commerce Website – Version 2: The E-Commerce Website provides a more modern, mobile-friendly ordering experience and can be used directly through a web browser on an iPhone or Android device. Customers can also add the website to their Home Screen, creating a shortcut that opens the ordering website like an app.
Getting Started with Online Ordering
When your vendor invites you online, or when you register via your vendor's website, you will receive an email inviting you to set your login password. If you are creating a new account:
- Click on the link provided in the email for setting a new password
- Enter your password
- Password must be 8-50 characters and must contain upper and lower case letters, numbers and special characters
- Confirm your password by entering it a second time
- Click Submit
You can now enter your User ID (email address) and Password and Login to your new account.
Notes:
If you have multiple sites to which your vendor delivers, each site will be a separate customer in your vendor's software. Use the same email address for each customer you are registering with the vendor. Once a password has been set for that email address, logging in will allow you to add orders for all sites (customers) using that email address.
If you have multiple accounts with an EasyVend vendor and/or accounts with multiple EasyVend vendors, the Switch Account option in the EasyVend Orders app menu allows you to switch between accounts without having to log out of the EasyVend Orders app and log back in again.
Once you have created your account, you can log into either the online order portal or the EasyVend Orders app to enter your orders. If your vendor has set up the payment portal, you can also use your debit or credit card to pay for orders and invoices. The portal and the app are functionally the same; which you use is down to convenience and personal preference.
The EasyVend Orders app by Jeal Tech Pty Ltd is free and can be downloaded from:
- Android: Google Play Store
- iOS: Apple App Store
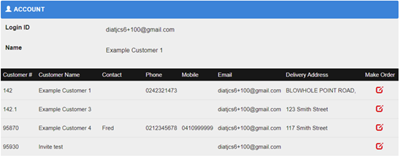
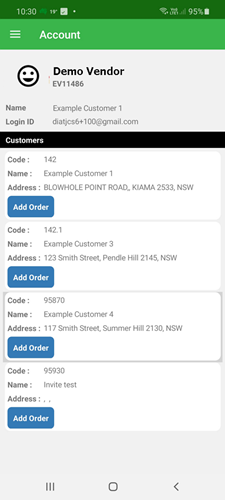
When you first log in, you will be taken to the Account screen which displays your login and customer details. From this screen, you can create a new order by clicking the  Make Order icon (online) or tapping the Add Order button (app).
If you have more than one customer address registered for the same login ID, you will be able to select the customer for whom you are creating the order.
Resetting your password
- If you forget your password and can't log in, you can use the Forgot Your Password? link to receive an email that will allow you to reset your password.
- In the online order portal login screen:
- Click Forgot Your Password?
- Enter the email address you use for logging in
- Tick I'm not a robot
- Click Submit
- An email will be sent to the email address you specify, with a link for resetting your password
- In the EasyVend Orders app login screen:
- Enter the email address you use for logging in
- Tap Login to EasyVend Orders
- When asked for your password, tap Forgot Your Password?
- Answer 'Ok' when asked to confirm the address to which the email will be sent
- You will receive an email with a link for resetting your password
- In the online order portal login screen:
- If you are logged in and just want to change your password, use the Password option in the main menu
Changing your email address
- When you create an order or make a payment, a confirmation email is sent to your login email address. If you need to change this email address, contact your vendor and ask them to issue a new invitation to the new email address.
- You will receive an email at the new address with a link for creating a password for the new address
- Once you have created your password, log in using the new email address and password
- The new email address will be linked to your existing account, so all your previous data will still be available
Top | Getting Started | Main Menu | New Order | Existing Orders | Invoices | Account | Password | Vendor | Switch Account | Logout
The Main Menu
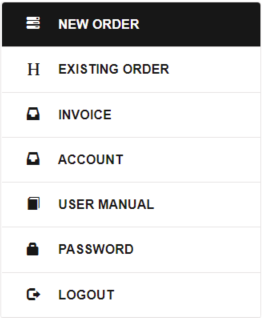
Select an option from the main menu to move about the order portal and app.
| Vendor Online Order Portal The menu is displayed on the left of the web page |
EasyVend Orders App Tap the menu icon (three horizontal bars) on the top left of screen |
 |
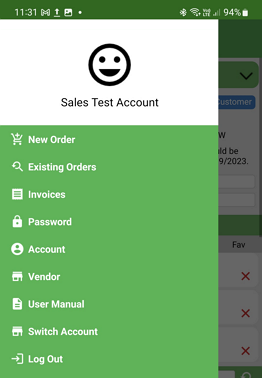 |
- New Order: Create a new order and submit it to your vendor
- Existing Orders: View a list of orders already placed; select an order to view its details and cancel, edit, copy or pay for the order (if your vendor has enabled online payments)
- Invoices: View a list of invoices issued to you; select an invoice to print it or pay for it (if your vendor has enabled online payments)
- User Manual: Open this user manual as a pdf file
- Password: Change your password
- Account: View your account details
- Vendor: In the app, view contact details for your vendor
- Switch Account (app only): Switch between multiple accounts with an EasyVend vendor and/or accounts with multiple EasyVend vendors, without having to log out of the EasyVend Orders app and log back in again
- Log Out
See the sections below for more information on each menu option.
Top | Getting Started | Main Menu | New Order | Existing Orders | Invoices | Account | Password | Vendor | Switch Account | Logout
New Order
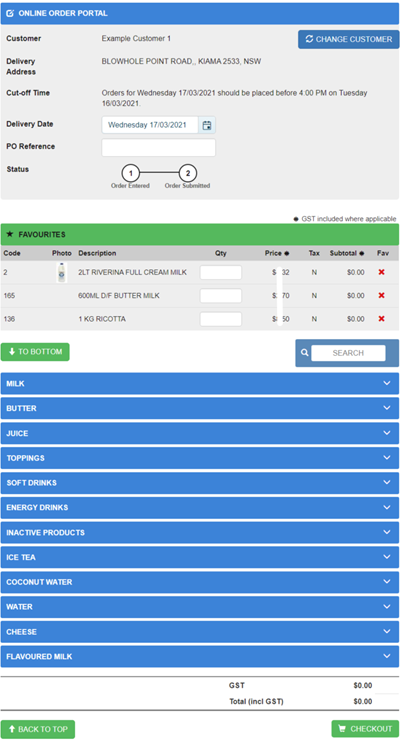
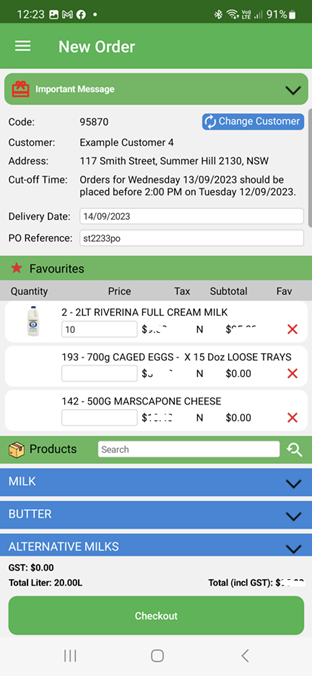
The New Order screen allows you to submit an order to your vendor for the selected date. Your vendor may also choose to display a message at the top of the New Order screen.
If your vendor automatically creates an order for you each day based on your standard order, you should not create a new order. Instead, in Existing Orders you can select the order created by your vendor and update it as required, provided the cutoff time has not passed.
| Vendor Online Order Portal | EasyVend Orders App |
 |
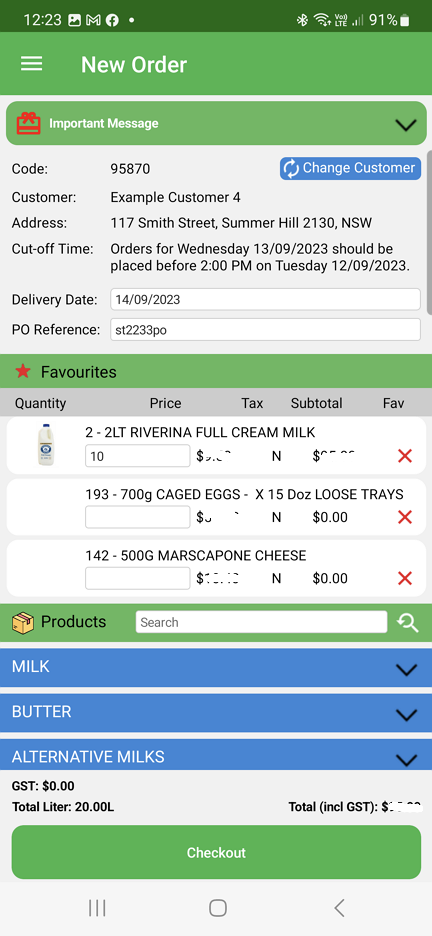  |
Customer Details
- Customer and Delivery Address: Check that your name and delivery address details are correct
- Change Customer: If you have more than one customer location registered for the same email ID, click this option to display a list of the customers using your login ID. Select the customer to which this order applies from the drop-down list.
- Cut-off Time: If your vendor has specified a cut-off time by which orders must be submitted, it will be displayed here
- Delivery Date: Select the date on which this order is to be delivered.
- Unavailable Dates:
- In the online web portal, unavailable dates will be greyed out in the calendar and you will be unable to select those dates
- In the EasyOrders app, if you try to Submit an order for an unavailable date, you will get a message that you cannot order on that day.
- You can go back to the New Order screen and select a new Delivery Date.
- A date will be unavailable if:
- The cut-off time for deliveries on that date has already passed
- Your vendor will not be delivering on that date
- Your vendor has recorded that you do not receive deliveries on that day of the week
- Note: When there is a public holiday on which there will be no deliveries, your vendor can set up an alternate "supplement" delivery date; in this case, you will be able to place an order for the alternate delivery date, even if you do not usually receive deliveries on that day.
- You are recorded as being on holidays on that date
- Existing Orders:
- If you already have an order for the selected date, a warning message is displayed
- This may occur if your vendor automatically creates an order each day, based on your standard order, or if you have already submitted an order for that day
- To avoid accidentally creating two orders for the same day:
- In the online portal:
- A window pops up:
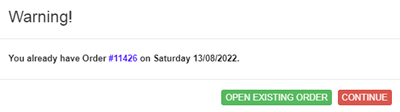
- Click Open Existing Order to update the existing order instead of creating a new order
- Click Continue if you really do have two orders for the same day (eg a morning and afternoon delivery) and wish to continue creating an additional order
- After continuing, a message "You have order #9999 on [Day] [Date] already" will continue to display next to the delivery date
- To update the existing order instead of continuing to create a new order, click on the order number in the message to go to the existing order
- A window pops up:
- In the EasyOrder app:
- You will see a message "You have order #9999 on [Day] [Date] already" below the delivery date
- To update the existing order instead of creating a new order:
- Click on the order number in the message to display the existing order
- If you really do have two orders for the same day (eg a morning and afternoon delivery), you can continue creating your additional order
- In the online portal:
- If you already have an order for the selected date, a warning message is displayed
- Unavailable Dates:
- PO Reference: Enter an optional purchase order reference number
- If your vendor has specified a default PO Reference that you wish to use, this will already be filled in for you
- Maximum length is 30 characters
The Product List
The products available for order from your vendor are listed below your customer details. Your 'Favourite' products are listed first, followed by other products sorted into categories chosen by your vendor.
Product Photos:
If a product has a photograph, to see a larger image in a pop-up window:
- In the Vendor Online Order Portal: Hover your mouse cursor over the phot
- In the EasyVend Orders App: Tap the photo
- Tap outside of the pop-up to hide it again
Favourites:
Favourites is used to make your most frequently ordered products easily accessible.
- If you have a standard order with your vendor, they may have already moved the standard order products to your Favourites list. If not, you can ask your vendor to add your standard order to your Favourites.
- To add a product to Favourites;
- Open the category of the product you wish to add by tapping the V to the right of the category name
- Tap the * next to the product you wish to add to Favourites
- To remove a product from Favourites:
- Tap the X next to the product you wish to remove from Favourites
Search for a Product
To search for a product:
- Enter a product code or a partial product description into the search box
- In the EasyVend Orders app, tap the search icon to activate the search
- The categories containing your search term will open, displaying the matching products in each category
- To clear a search, tap the X on the right of the search box
- The categories opened by the search will close again
Product Categories:
For less frequently ordered products, you can scroll through the list of product categories. To open and close a category, use the ^ and v arrows to the right of each category name. Opening a category displays the list of products in that category.
Note: In the order portal, when you enter an order quantity for a product, the category icon changes to a pin  and the category cannot be closed until you remove orders from that category or submit your order.
Placing Your Order
- If you have more than one customer site, check the correct customer is displayed
- If not, use Change Customer to select the correct customer
- Select the delivery date for this order
- Unavailable Dates:
- In the online web portal, unavailable dates will be greyed out in the calendar and you will be unable to select those dates
- In the EasyOrders app, if you try to Submit an order for an unavailable date, you will get a message that you cannot order on that day.
- You can go back to the New Order screen and select a new Delivery Date.
- A date will be unavailable if:
- The cut-off time for deliveries on that date has already passed
- Your vendor will not be delivering on that date
- Your vendor has recorded that you do not receive deliveries on that day of the week
- Note: When there is a public holiday on which there will be no deliveries, your vendor can set up an alternate "supplement" delivery date; in this case, you will be able to place an order for the alternate delivery date, even if you do not usually receive deliveries on that day.
- You are recorded as being on holidays on that date
- Existing Orders:
- If you already have an order for the selected date, a warning message is displayed
- This may occur if your vendor automatically creates an order each day, based on your standard order, or if you have already submitted an order for that day
- To avoid accidentally creating two orders for the same day:
- In the online portal, a window pops up:
- Click Open Existing Order to update the existing order instead of creating a new order
- Click Continue if you really do have two orders for the same day (eg a morning and afternoon delivery) and wish to continue creating an additional order
- After continuing, a message "You have order #9999 on [Day] [Date] already" will continue to display next to the delivery date
- To update the existing order instead of continuing to create a new order, click on the order number in the message to go to the existing order
- In the EasyOrder app, you will see a message "You have order #9999 on [Day] [Date] already" below the delivery date:
- Click on the order number in the message to display the existing order so you can update the existing order rather than create a new order
- If you really do have two orders for the same day (eg a morning and afternoon delivery), you can continue creating your additional order
- In the online portal, a window pops up:
- If you already have an order for the selected date, a warning message is displayed
- Unavailable Dates:
- Enter a PO Reference if required
- Enter the quantity you are ordering for each product
- Quantities can be entered in either the Favourites section, or in the product category sections; the quantity will appear in both sections
- You will be unable to enter a quantity for any product that the vendor has marked as 'Out of Stock'
 : A question mark icon is displayed next to the product description if your vendor is enforcing the ordering of whole crates/boxes for this product
- Click the icon to display the tooltip which includes the quantity in a crate/box for this product
- If a quantity is entered that is not a whole box/crate, the order quantity will be automatically rounded up to the next whole crate/box
- For example, if the tooltip says "Order quantity should always be multiple of [5]" and you enter a quantity of 6, it will be rounded up to 10
- Remember to add products to your Favourites if you order them often
- As you enter quantities, the Subtotal for each product and the Total value of your order are updated
- When you are happy with the order, click the Checkout button
Notes:
- If your vendor has set a credit limit for your purchases, and this order would mean you exceed that credit limit, you must pay for this order before it can be submitted.
- Your vendor may have set a minimum order value and/or a minimum order literage. If this is the case and your order is less than the minimum(s), you will be unable to submit the order. A message will be displayed:
- "Total Order Amount is less than the Minimum Online Order $xx" and/or
- "Total Order Literage cannot be less than xxL. Current Literage is yyL."
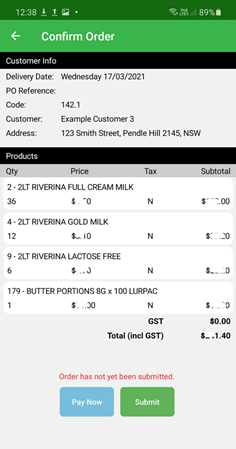
- The Confirm Order screen will be displayed
Vendor Online Order Portal EasyVend Orders App 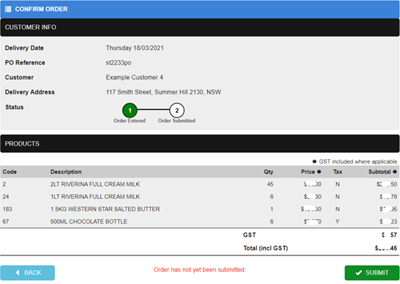
- In the Confirm Order screen:
- If you need to make changes to the order, you can return to the New Order screen:
- In the online order portal, click the Back button
- In the EasyVend Orders app, tap the ← in the top left corner
- Once you are happy with the order:
- Click the Submit button to send the order to your vendor
- In the EasyVend Order app, if your vendor has enabled online payments, the Pay Now button enables you to enter you credit card details and then tap Submit to send your order and payment together
- If you need to make changes to the order, you can return to the New Order screen:
When an order is successfully submitted, a confirmation screen is displayed and a confirmation email is sent to your login email address. From the confirmation screen you can:
- View the details of the order just placed
- See Existing Orders below for information on cancelling, editing, paying or copying the order
- Add another order
Top | Getting Started | Main Menu | New Order | Existing Orders | Invoices | Account | Password | Vendor | Switch Account | Logout
Existing Orders
The Existing Orders option enables you to view a list of existing orders, and select an order to view its details and cancel/update the order if the cutoff time for that delivery has not passed.
Order List
Existing Orders initially shows a list of orders already placed. You can restrict the orders listed by setting filters for date, customer and/or order status. To set filters for the list of orders:
- From and To Dates: Select the start and end dates of the period you wish to see
- Customers: Select a specific customer from the list, or select All Customers
- Status: Select a specific status for the orders you wish to view, or select All Status
- Click Search
Click or tap on any order in the list to view that order's details.
Order Details
Selecting an order from the list of existing orders displays the order details. From the Order Details screen you can:
- Cancel Order: Cancel the the order entirely
- An order can be cancelled as long as the cutoff time has not passed and the order has not been cancelled, confirmed, delivered or invoiced
- An order can be cancelled as long as the cutoff time has not passed and the order has not been cancelled, confirmed, delivered or invoiced
- Copy Order: Create a new order by copying this order
- Copying an order takes you to the New Order screen, with the quantities from the copied order carried over to the new order
- You can change the customer if required
- You must enter a delivery date for the new order
- Products and quantities in the new order can be changed as required
- Pay Now: If your vendor has enabled online payments, pay for this order using your debit or credit card
- When you select this option, the total amount payable for this order (including any credit card surcharge) is displayed
- If you have already given your debit or credit card details to your vendor to be saved in the system, you will be able to select whether to:
- Continue with my existing card
- Use different card
- If your card has not been stored in the system, or you have opted to use a different card, enter your card details
- The card details you enter here are not stored - you will have to enter your card details each time you make a payment
- Contact your vendor if you wish him to store your card details so you do not have to enter them each time
- Click Submit
- To exit without making a payment for the order:
- In the order portal, click Cancel
- In the app, click Back
- When an order is paid, an invoice for just that order is created
- The invoice is marked as Paid
- The order will NOT be re-invoiced when your vendor creates his usual daily/weekly/monthly invoices
- A confirmation email will be sent to your login email address, with a copy of the paid invoice attached
- Edit: Change the order details
- An order can be edited as long as the cutoff time has not passed and the order has not been cancelled, confirmed, delivered or invoiced
- : A question mark icon is displayed next to the product description if your vendor is enforcing the ordering of whole crates/boxes for this product
- Click the icon to display the tooltip which includes the quantity in a crate/box for this product
- If a quantity is entered that is not a whole box/crate, the order quantity will be automatically rounded up to the next whole crate/box
To return to the Orders List:
- In the online order portal, click the Order List tab at the top of the screen
- In the EasyVend Orders app, tap the ← in the top left corner
Top | Getting Started | Main Menu | New Order | Existing Orders | Invoices | Account | Password | Vendor | Switch Account | Logout
Invoices
The Invoices option displays a list of invoices issued, showing the status of the invoice with any payments made and the balance outstanding. You can select an invoice from the list to view its details, print it, or pay the invoice (if your vendor has online payments enabled).
Invoice List
Invoices initially shows a list of previous invoices. You can restrict the invoices listed by setting a filter for the date range you wish to view:
- From and To Dates: Select the start and end dates of the period you wish to see
- Click Search
To view the details of an invoice:
- In the online order portal, click the
 folder icon to the right of the invoice
 - In the EasyVend Orders app, tap the invoice
Invoice Details
Selecting an invoice from the list displays the invoice details. From the Invoice Details screen you can:
- Print: Download the invoice as a PDF file which can be opened in your PDF viewer for viewing and printing
- Pay Now: If your vendor has enabled online payments, pay for this invoice using your debit or credit card
- When you select this option, the total amount payable for this invoice (including any credit card surcharge) is displayed
- An invoice cannot be paid if:
- It is already paid in full
- It is for a negative amount
- It has been cancelled
- An invoice cannot be paid if:
- If you have already given your debit or credit card details to your vendor to be saved in the system, you will be able to select whether to:
- Continue with my existing card
- Use different card
- If your card has not been stored in the system, or you have opted to use a different card, enter your card details
- The card details you enter here are not stored - you will have to enter your card details each time you make a payment
- Contact your vendor if you wish him to store your card details so you do not have to enter them each time
- Click Submit
- To exit without making a payment for the invoice:
- In the order portal, click Cancel
- In the app, click Back
- When you select this option, the total amount payable for this invoice (including any credit card surcharge) is displayed
To return to the Invoice List:
- In the online order portal, click the Invoice List tab at the top of the screen
- In the EasyVend Orders app, tap the ← in the top left corner
Top | Getting Started | Main Menu | New Order | Existing Orders | Invoices | Account | Password | Vendor | Switch Account | Logout
Account
The Account screen displays your login and customer details. From this screen, you can create a new order by clicking the Make Order icon (online) or tapping the Add Order button (app).
| Vendor Online Order Portal | EasyVend Orders App |
 |
 |
Top | Getting Started | Main Menu | New Order | Existing Orders | Invoices | Account | Password | Vendor | Switch Account | Logout
Password
Use this option to change your password:
- Enter your current password
- Enter your new password
- Password must be 8-50 characters and must contain upper and lower case letters, numbers and special characters
- Confirm your new password by entering it a second time
- Click Change Password
Top | Getting Started | Main Menu | New Order | Existing Orders | Invoices | Account | Password | Vendor | Switch Account | Logout
Vendor
In the EasyVend Orders app, the Vendor menu option displays the contact details of your vendor.
Top | Getting Started | Main Menu | New Order | Existing Orders | Invoices | Account | Password | Vendor | Switch Account | Logout
Switch Account (EasyVend Orders App Only)
If you have multiple accounts with an EasyVend vendor and/or accounts with multiple EasyVend vendors, this option allows you to switch between accounts without having to log out of the EasyVend Orders app and log back in again.
To add a new account:
- Select Switch Account from the menu
- Tap Add Account
- Enter your login details
To switch between accounts once you have added the additional account(s):
- Select Switch Account from the menu
- In the list of accounts you have added, tap the account you wish to switch to
- The Account screen for the selected account will be displayed
Top | Getting Started | Main Menu | New Order | Existing Orders | Invoices | Account | Password | Vendor | Logout
Logout
Log out of the order portal or app.
- You will be automatically logged out of the order portal after a period of inactivity
- If you do not log out of the EasyVend Orders app, it will remember you next time you open the app
Top | Getting Started | Main Menu | New Order | Existing Orders | Invoices | Account | Password | Vendor | Logout